• Skip to primary navigation
  • Skip to main content
  • Skip to primary sidebar
  • Skip to footer
Spoon Fork BaconSpoon Fork Bacon
  • Navigation Menu: Social Icons

    • Facebook
    • Instagram
    • Pinterest
    • YouTube
    • Twitter
    • TikTok
  • What’s for Dinner?
  • Recipes By Category
  • Most Recent
  • Contact
  • Shop
menu icon
go to homepage
subscribe
search icon
Homepage link
  • Recipes By Category
  • Most Recent
  • What’s for Dinner?
  • Shop
  • Contact
    • Facebook
    • Instagram
    • Pinterest
    • YouTube
    • Twitter
    • TikTok
  • ×

    Home > Blog > DIY > Rosemary Wreath Place Cards

    Rosemary Wreath Place Cards

    by Teri Lyn Fisher · Published: Nov 12, 2020 · Modified: Nov 28, 2020

    Jump to Instructions Print Instructions Jump to Video
    A really simple DIY to make Rosemary Wreath Place Cards. These go perfect with any thanksgiving or holiday table! This DIY needs only a handful of supplies to make.
    Rosemary Wreath Place Card on a plate in a table setting.
    Rosemary wreath place cards on a napkin on a plates.
    Rosemary wreath place cards on napkins on plates.
    Rosemary wreath place cards on a platter with a napkin.
    Rosemary wreath place card up close on a plate.
    Six rosemary wreath place cards on a table spread out.
    Rosemary wreath place cards on a platter with a napkin.
    Rosemary wreath place cards with plates and linens.
    Rosemary Wreath Place Card on a plate in a table setting.
    Rosemary Wreath Place Card on a plate in a table setting.

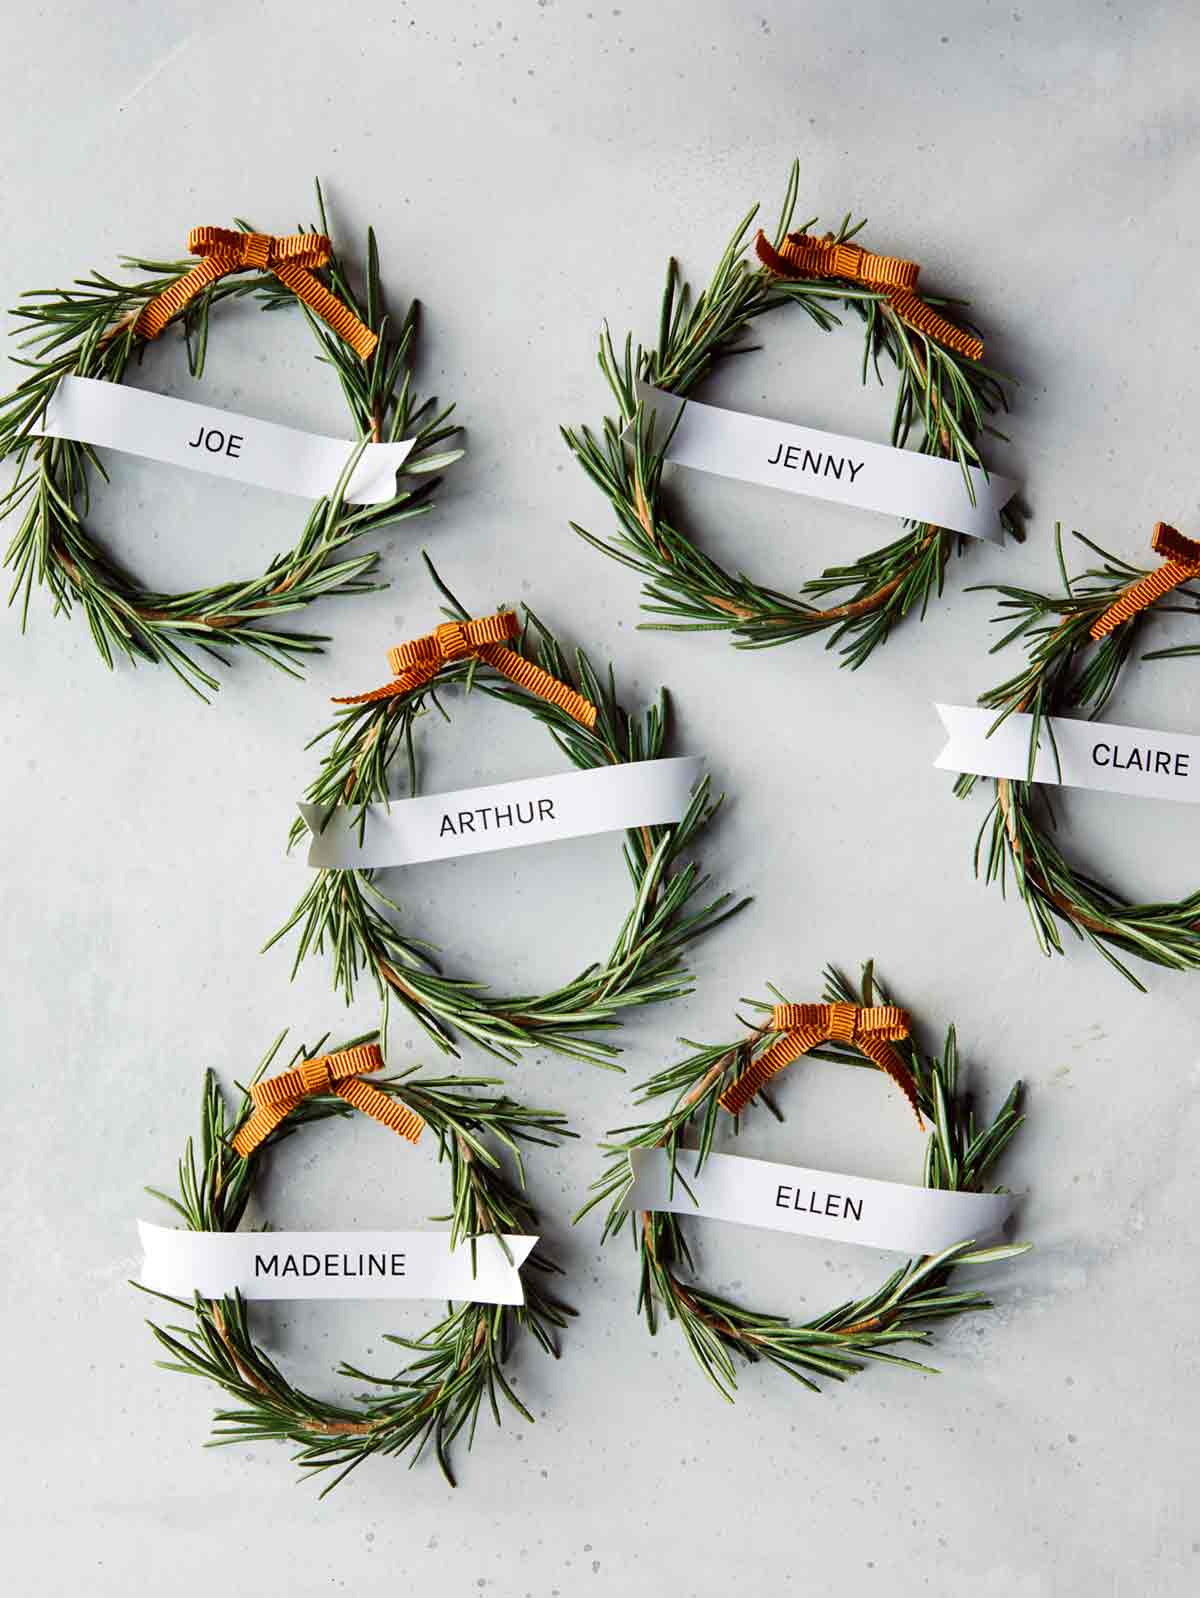
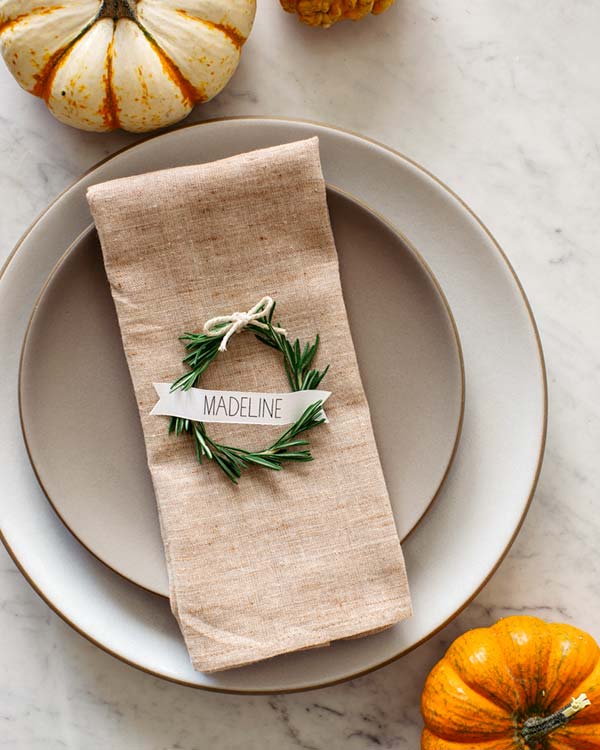
    At the farmers market I go to this one booth has these crazy long stems of rosemary. They are so huge and fragrant. I am always trying to think of a creative non food way of using them. This idea of using them for place cards just popped into my head and seemed like a winner. So, I went with it, and now we have this cute little Rosemary Wreath Place Cards DIY for you! Perfect for Thanksgiving, obviously. This project is really simple. All you need are rosemary sprigs, floral wire, scissors, and twine or ribbon. This DIY also takes very little skill, so don’t worry if you are terrible at crafting!

    Let’s get started below!

    Six rosemary wreath place cards on a table spread out.

    How to make Rosemary Wreath Place Cards
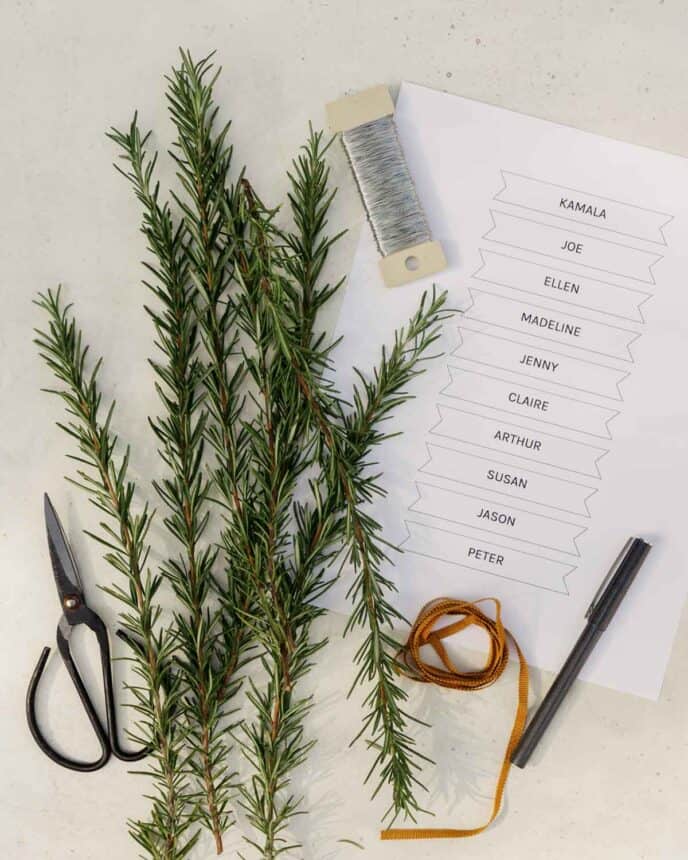
    Supplies

    Supplies for rosemary wreath place cards on a surface.

    I love this DIY because the supplies requires are pretty easy to get! 

    • Rosemary sprigs – check out below in the tips and tricks section of this site for more info and how to choose the best sprigs 
    • Scissors 
    • Name Tags – Each name tag should be about 3.75″ x .5″. This is a good size for the circumference of the wreaths you end up. You can print this template I made and write in the names by hand, or type them in.
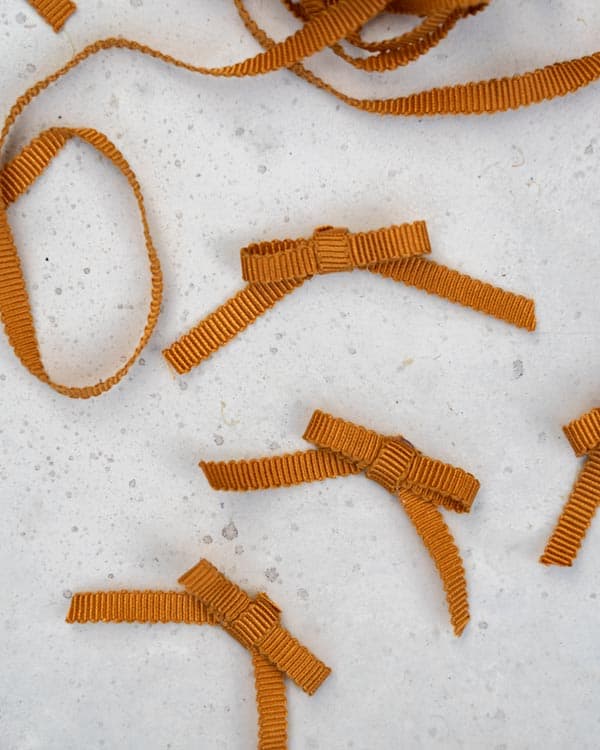
    • Ribbon or Twine – the ribbon you see in the image that I used is by Peter Sham and it’s absolutely beautiful. I am using the quarter inch width. You can use whatever you prefer. 
    • Floral Wire
    • A pen or pencil – must be smooth and not have ridges on the outside. 

    Process

    1. Print out the name tag template – or make your own. Cut out each name tag. 
    2. Using a smooth sided pencil or pen, curl the edges of the name tag strips in opposite directions. Set aside. 
    3. Cut floral wire into 6 short length, approximately 3 inches each. 
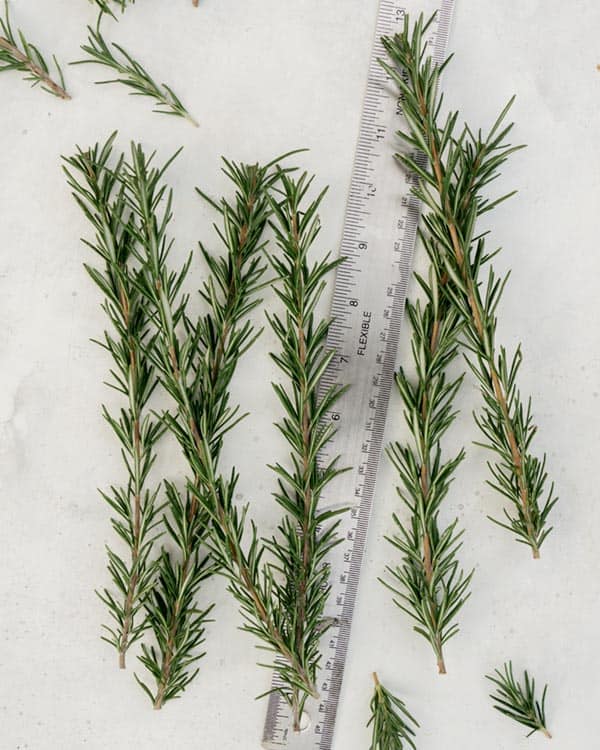
    4. Prepare the rosemary sprigs. First trim each sprig to be between 7 and 9 inches in length. Trim the top of the sprig off first to remove the weak top and get to the thicker stem part of the sprig. Then trim the bottom to get the total length to be between 7 and 9 inches. 
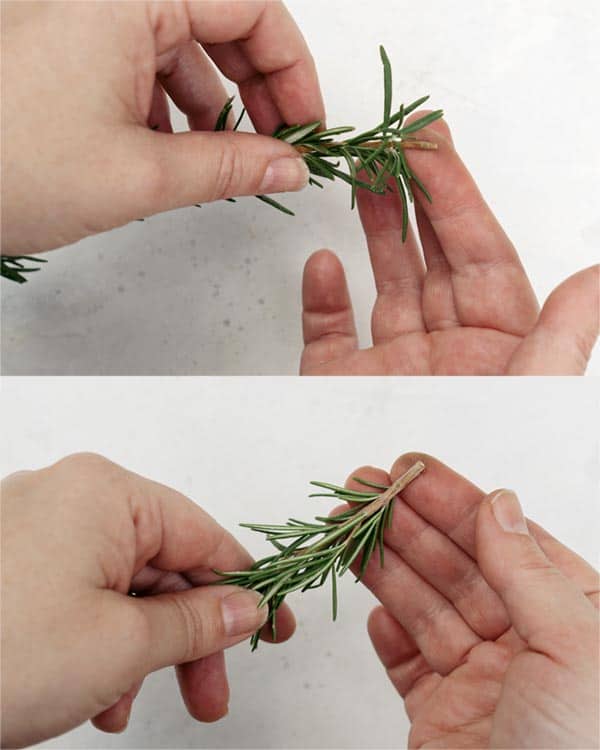
    5. Remove rosemary leaves at the top and bottom of each sprig, revealing approximately a quarter to a half and inch of bare stem on each end. 
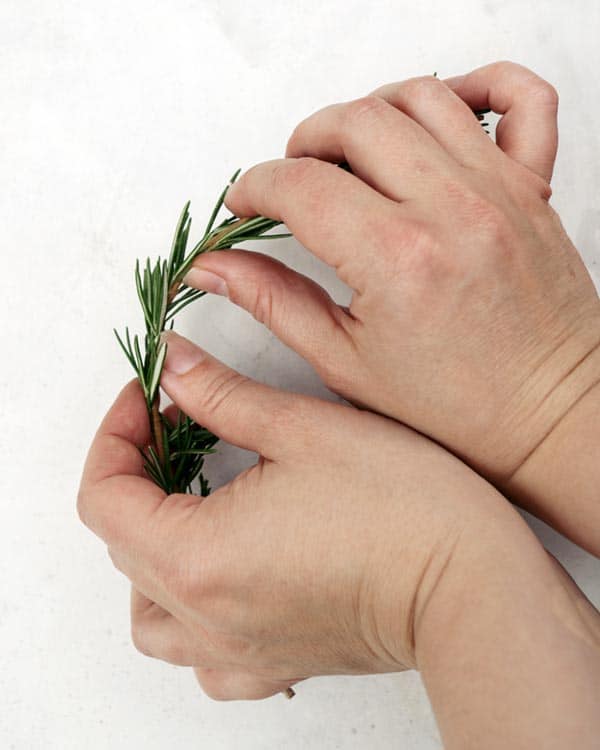
    6. Working from the thickest part of the stem to the thinnest, gently flex the sprig with your fingers to make it more pliable. 
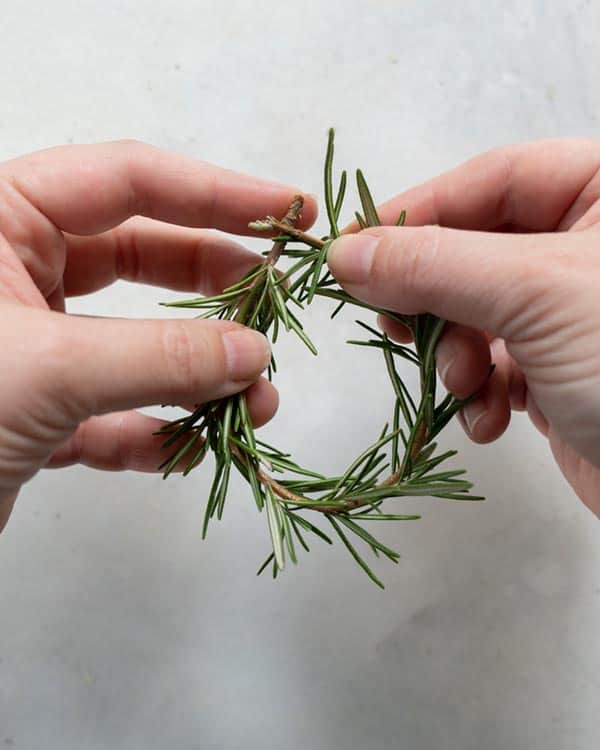
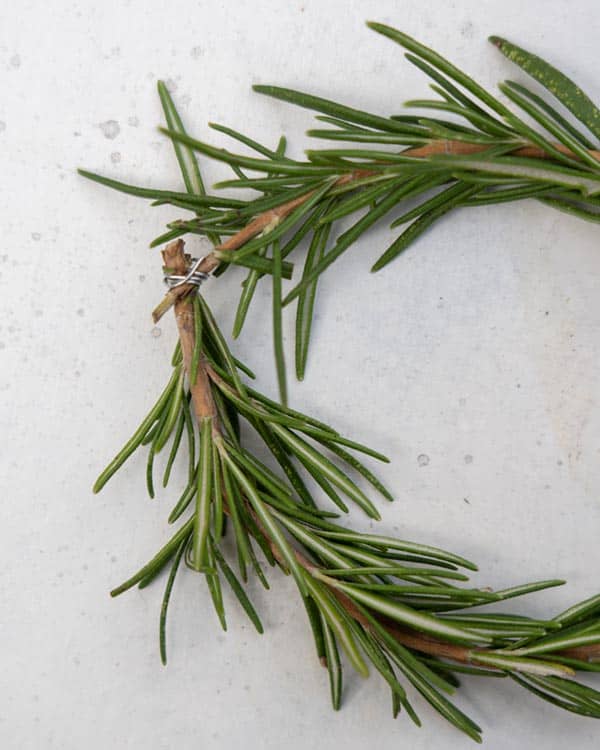
    7. Grab each end of the sprig and make a circle by crossing the two ends. Secure with the pre cut floral wire by winding it around the two ends together, 
    8. Tie a ribbon or twine around the floral wire to cover it and make a bow. You can also hot a glue a pre-made bow to the top of the wreath as well. 
    9. Tuck the curled name tags into the rosemary leaves, and then enjoy your rosemary wreaths. 
    Name tags for Rosemary Wreath Place Cards DIY.
    Print and cut our your name tags.
    Curling the edges of name tags with a pen.
    Curl the edges of the name tags in opposite directions with a smooth sided pen or pencil.
    Floral wire cut into six short lengths with scissors next to it.
    Cut floral wire into size 3″ lengths.
    Measuring rosemary sprigs with a ruler.
    Measure the rosemary springs and trim the top and bottom so each sprig measures about 7 to 9 inches.
    Peeling of rosemary leaves on either side of the stems.
    Peel off rosemary leaves on either end of each sprig so you get a bare stem.
    Bend the rosemary sprigs with your hands to make it able to go into a circle.
    Bend the rosemary sprigs to make them more pliable.
    Making a rosemary wreath.
    Cross the two ends together.
    Attaching the ends of a rosemary sprig with floral wire to make a wreath.
    Attach the ends together using floral wire.
    Bows made out of mustard colored ribbon.
    Pre-make bows our of your ribbon – or you can tie a bowl around with wreath.
    Close up on a single rosemary wreath.
    Using a glue dot secure your bowl. If you would rather just tie twine or ribbon abound the wreath that works great too!
    Rosemary wreaths all laid out on a surface.

    Tips and Tricks

    • If you don’t have floral wire, you can use twist ties.
    • You can make these ahead! Depending on how fresh your rosemary is, these will last for about 5 days. You can store them in the refrigerator on a baking sheet in a single layer. Place a damp paper towel over the top and replace as needed.

    Rosemary Sprig Tips

    • It is better to try and purchase rosemary sprigs that come in a bundle and not in a plastic clamshell. That way you will be able to get the longest sprigs possible. Farmers markets are a great place to get longer rosemary sprigs. If you have a neighbor with a big plant – hit them up!
    • The sprigs that work best are the ones with a single stem. If you get some other sprigs that have some sprigs coming off the main stem go ahead and just trim those off.
    • My favorite way to wash rosemary is by filling the sink with about two inches of water and letting them soak for a little. You can move them around in the water and then dry them with a towel. This gets them very clean!
    • When you are flexing the rosemary sprigs to make them more pliable, do this carefully and little by little. You want to avoid snapping the stem because it will make your wreath crooked.
    Rosemary wreath place cards with plates and linens.
    Rosemary wreath place card up close on a plate.

    More DIYs you will love!

    • Rosemary Wreath Gift Toppers
    • DIY Mini Wreath Place Cards
    • Cement and Wood Place Card DIY
    • DIY Place Cards
    Rosemary wreath place cards on napkins on plates.
    Rosemary wreath place cards on a napkin on a plates.

    Check out of Rosemary Wreath Place Card Google Web Story.

    Hungry for more?

    Subscribe to never miss a recipe. Follow along on Instagram, Facebook, Twitter, and Pinterest.

    Rosemary wreath place cards on a platter with a napkin.

    Rosemary Wreath Place Cards

    A really simple DIY to make Rosemary Wreath Place Cards. These go perfect with any thanksgiving or holiday table! This DIY needs only a handful of supplies to make.
    DIY BY Teri & Jenny
    PRINT HOW TO
    5 from 1 vote
    Prep Time: 10 mins
    Active Time: 20 mins
    Total Time: 30 mins
    Servings: 6

      EQUIPMENT  

    • Rosemary sprigs
    • Printed Name Tags (or strips of paper to hand write names)
    • Scissors
    • Floral Wire
    • Ribbon or Twine
    • Pen or pencil that is smooth sided
    • Hot Glue Gun (optional)

      SUPPLIES  

    • 6 Rosemary Sprigs
    • 6 Name tag strips- 3.75" x .5" each Printed from this template – or your own.
    • Scissors
    • Floral Wire
    • Ribbon or twine
    • Pen or pencil that has smooth sides
    • Hot glue gun optional

      INSTRUCTIONS  

    • Print my name tag template. You can either hand write in the names, or add them in on the computer. Cut out each name tag. If you are making your own, cut strips of paper to be approximately 3.75" x .5".
    • Using a pencil, small dowel, or a pen that has smooth sides. Curl the edges of the name tags in opposite directions.
    • Cut the floral wire into 6 lengths approximately 3 inches each.
    • Trim rosemary springs into lengths between 7 and 9 inches. First trim the top off, then the bottom. When you trim the top, you want to try and get down to the thicker stalk part of the sprig, that way when you wire it, it will hold much better.
    • Remove rosemary leaves at the top and bottom of the sprig to reveal a half inch or a quarter in of stick. This is where you will wind the floral wire.
    • Working from the thickest part of the sprig to the thinner, gently flex the sprig to make it more pliable.
    • Gently make a circle by crossing the two ends of the rosemary sprig. Wind the pre cut floral wire around the ends.
    • Tie a ribbon or twine, or hot glue a ribbon to the rosemary wreath to cover the floral wire.
    • Tuck the name tags within the rosemary leaves. Enjoy your rosemary wreaths!

      NOTES  

    Depending on the freshness of your rosemary – these will last up to 5 days in the refrigerator. Store in a single layer under damn paper towels to keep the leaves looking nice. Replace the damp paper towels once a day. 

    You Might Also Love...

    • Rosemary Sprig Place Card DIY on a table setting.Rosemary Sprig Place Cards
    • Dehydrated citrus on a surface on plates with fresh citrus.Dehydrated Citrus Wheels
    • Mini Wreath Place cards DIY on a plate for a special occasion.Mini Wreath Place Cards – DIY

    November 12, 2020 / 88 Comments

    About Teri Lyn Fisher

    Teri Lyn Fisher is half of Spoon Fork Bacon. She is also a food and cosmetics photographer. She is a big fan of hot dogs. #sfbTERI

    Previous Post: < Previous Post Mushroom and Sage Stuffing
    Next Post: Rosemary Sprig Place Cards Next Post >

    Reader Interactions

    November 12, 2020 / 88 Comments

    Comments

      Leave a Reply Cancel reply

      Your email address will not be published. Required fields are marked *

      Recipe Rating


      Did you make this recipe? We want to see!

      tag @SpoonForkBacon and #SpoonForkBacon on Instagram

    1. Maggie

      December 22, 2022 at 6:31 pm

      Excellent! Loved the written and pictured instructions. Very clear and detailed. Thanks a million.

      Reply
      • Jenny Park

        December 23, 2022 at 9:05 am

        Yes, it definitely works in a roasting pan!

        Reply
    2. Marisa

      October 27, 2021 at 3:23 pm

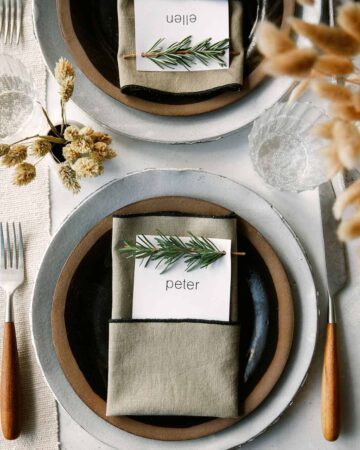
      I saw these at https://www.thekitchn.com/for-a-holiday-table-rosemary-sprig-place-cards-198017…and I love them! Can you tell me what font you used on these examples (article says you supplied the images?).

      Reply
      • Teri Lyn Fisher

        October 28, 2021 at 2:30 pm

        Hi! Please see this post: https://www.spoonforkbacon.com/rosemary-sprig-place-cards/

        Reply
    3. Amber

      November 19, 2020 at 4:27 am

      Hi Teri Lyn!
      These are adorable- but i have to ask, where are those plates and chargers from?! I LOVE them!!

      Reply
      • Teri Lyn Fisher

        November 19, 2020 at 9:42 am

        Thank you! The top white place is from Elephant Ceramics – it’s one of a kind. The gray/blue plate is vintage – and the bottom plate with the terracotta edge is from Mondays – http://www.mondaysbk.com/

        Reply
    4. Jame

      February 14, 2019 at 12:45 am

      Such a great idea!

      Reply
    5. Helena

      November 20, 2018 at 5:27 pm

      I love these rosemary wreaths. They’re just adorable. I love using rosemary for everything but I’ve never used it this way. I’m going to make and use them this week. Thanks for such a cute idea.

      Reply
    6. Jackie

      October 24, 2018 at 7:32 am

      What kind of paper did you use for the nametag?

      Reply
      • Teri Lyn Fisher

        November 14, 2018 at 9:54 am

        I just used a heavier card stock!

        Reply
    7. veefx

      March 15, 2018 at 9:09 pm

      Such a great idea!

      Reply
    8. V8web

      January 13, 2018 at 8:38 pm

      Perfect for the upcoming summer!

      Reply
    9. Natalie

      November 18, 2017 at 9:06 am

      Love it, planning on doing this for thanksgiving! How far in advance can I make them so they stay fresh (or at least don’t turn brown?)

      Reply
      • Teri Lyn Fisher

        November 18, 2017 at 10:01 am

        I would say you could leave them in the fridge and make them up to three days in advance – but it really depends on how fresh the rosemary you will be using is. :)

        Reply
    10. Yumvilla

      October 11, 2017 at 7:30 am

      This would be great any time of year. Thank you!

      Reply
    11. Hasena Beds

      September 05, 2017 at 3:56 am

      This looks very cute. Nice idea. Thanks for sharing this post.

      Reply
    12. meal5

      May 22, 2017 at 7:50 pm

      Such a cute idea! Lovely!

      Reply
    13. Jacqueline

      May 20, 2017 at 6:00 pm

      Hi Terilyn,

      I am looking at making about 120 of these for my wedding; how long did it take you to make one after the soaking process? Just want to make sure I have enough hands on deck to help out and that we are not scrambling to get them done.

      Thanks for your help and so looking forward to seeking these beauties on all the tables for my big day!

      Reply
      • Teri Lyn Fisher

        May 21, 2017 at 8:54 pm

        Hi Jacqueline, Not very long. Maybe about 5 min each? I think you should def do a trial run to see how long it may take you, but I’m sure once you get the hang of it, it will go quickly!

        Reply
    14. Karen

      February 01, 2017 at 9:11 am

      Hi Teri! I absolutely love these rosemary wreaths for a table setting. I would love to make these for my daughter’s baptism dinner this weekend. However, the name tag template is now protected and I cannot get it to save as a word document. Is there anyway you can please provide an unprotected version? Please, oh please!! :)

      Reply
      • Teri Lyn Fisher

        February 01, 2017 at 3:15 pm

        Hi Karen! Word doesn’t open PDF. What you need to do is start a word doc and insert the PDF as a picture into your word doc. Hope this helps!

        Reply
        • Dani

          March 08, 2018 at 12:18 pm

          Hi Tery! Sorry but I don‘t understand how to make it writeable in Word if I insert the PDF as a picture!? Could you please describe it a bit more in detail? Thanks and many regards from Germany :-)

          Reply
          • Teri Lyn Fisher

            March 11, 2018 at 8:58 am

            Hi Dani – You will need to write over the image in word. It looks like there are a ton of video how tos if you google “how to write over an image in word” Good luck!

            Reply
    15. Rachel

      December 12, 2016 at 4:27 pm

      Hi there! How long should I soak the rosemary to make it more pliable? Thank you :)

      Reply
      • Teri Lyn Fisher

        December 14, 2016 at 7:50 pm

        I only soaked them for about 20 min, but the longer you soak the more pliable they become.

        Reply
        • Rachel

          December 21, 2016 at 4:13 pm

          Thank you! Merry Christmas :)

          Reply
    16. Marisa

      December 07, 2016 at 9:17 am

      What an adorable idea! And to think I have Rosemary growing right outside my door. This would be great any time of year. Thank you!

      Reply
    « Older Comments

    Primary Sidebar

    HI! WE ARE GLAD YOU'RE HERE!

    Teri and Jenny of Spoon Fork Bacon

    We hope you find something you love in
    our little corner of the internet.
    XOXOXO, Teri + Jenny

    ABOUT US

    As Featured On

    A complication of logos showcasing where Spoon Fork Bacon has been featured. Including delish, today show, cosmopolitan, good morning america, domino, good housekeeping, william sonoma, and country living.

    Asian Inspired

    BBQ

    PORK

    DESSERT

    For Dinner Tonight

    • Panko crusted lamb chop recipe on a plate. Panko-Crusted Lamb Chops Recipe
    • Tteokbokki recipe on a platter. Tteokbokki (Korean Spicy Rice Cakes)
    • Cajun shrimp pasta recipe in a bowl with a fork on the side. Cajun Shrimp Pasta
    • Korean Army Stew or Budae Jjigae in a pot ready to be served. Budae Jjigae (Korean Army Stew)
    • Shrimp scampi recipe on a plate with bread and lemon wedges. Shrimp Scampi Recipe
    • A collage of our best Valentine's dinner ideas. Best Valentine’s Day Dinner Ideas

    Popular Now

    • Fried pickle chips on a platter with ranch dressing. Fried Pickle Chips
    • Carrot cake recipe on a cake stand with a slice out. Carrot Cake Recipe
    • Shrimp scampi recipe on a plate with bread and lemon wedges. Shrimp Scampi Recipe
    • Brown Butter Colcannon recipe in a bowl with a spoon in it. Brown Butter Colcannon
    • Chicken and gnocchi soup in a bowl with bread on the side. Chicken Gnocchi Soup
    • Cajun shrimp pasta recipe in a bowl with a fork on the side. Cajun Shrimp Pasta

    Footer

    As Featured On
    As featured on graphic.

    GET NEW RECIPES DELIVERED TO YOUR INBOX!

    Thank you!

    You have successfully joined our subscriber list.

    Footer

    • Facebook
    • Instagram
    • Pinterest
    • RSS Feed
    • Twitter
    • TikTok

    All content including images © 2011-2022 Teri Lyn Fisher & Jenny Park. Stealing is bad karma.

    Spoon Fork Bacon contains paid advertising banners and occasionally affiliate links, and sponsored posts.
    As an Amazon Associate I earn from qualifying purchases.

    Sponsored posts are indicated at the start of such posts. All of our opinions are always our own.
    Thank you for supporting our sponsors. It helps us pay to run this site and bring you unique and original recipes.

    Privacy Policy | Accessibility Statement