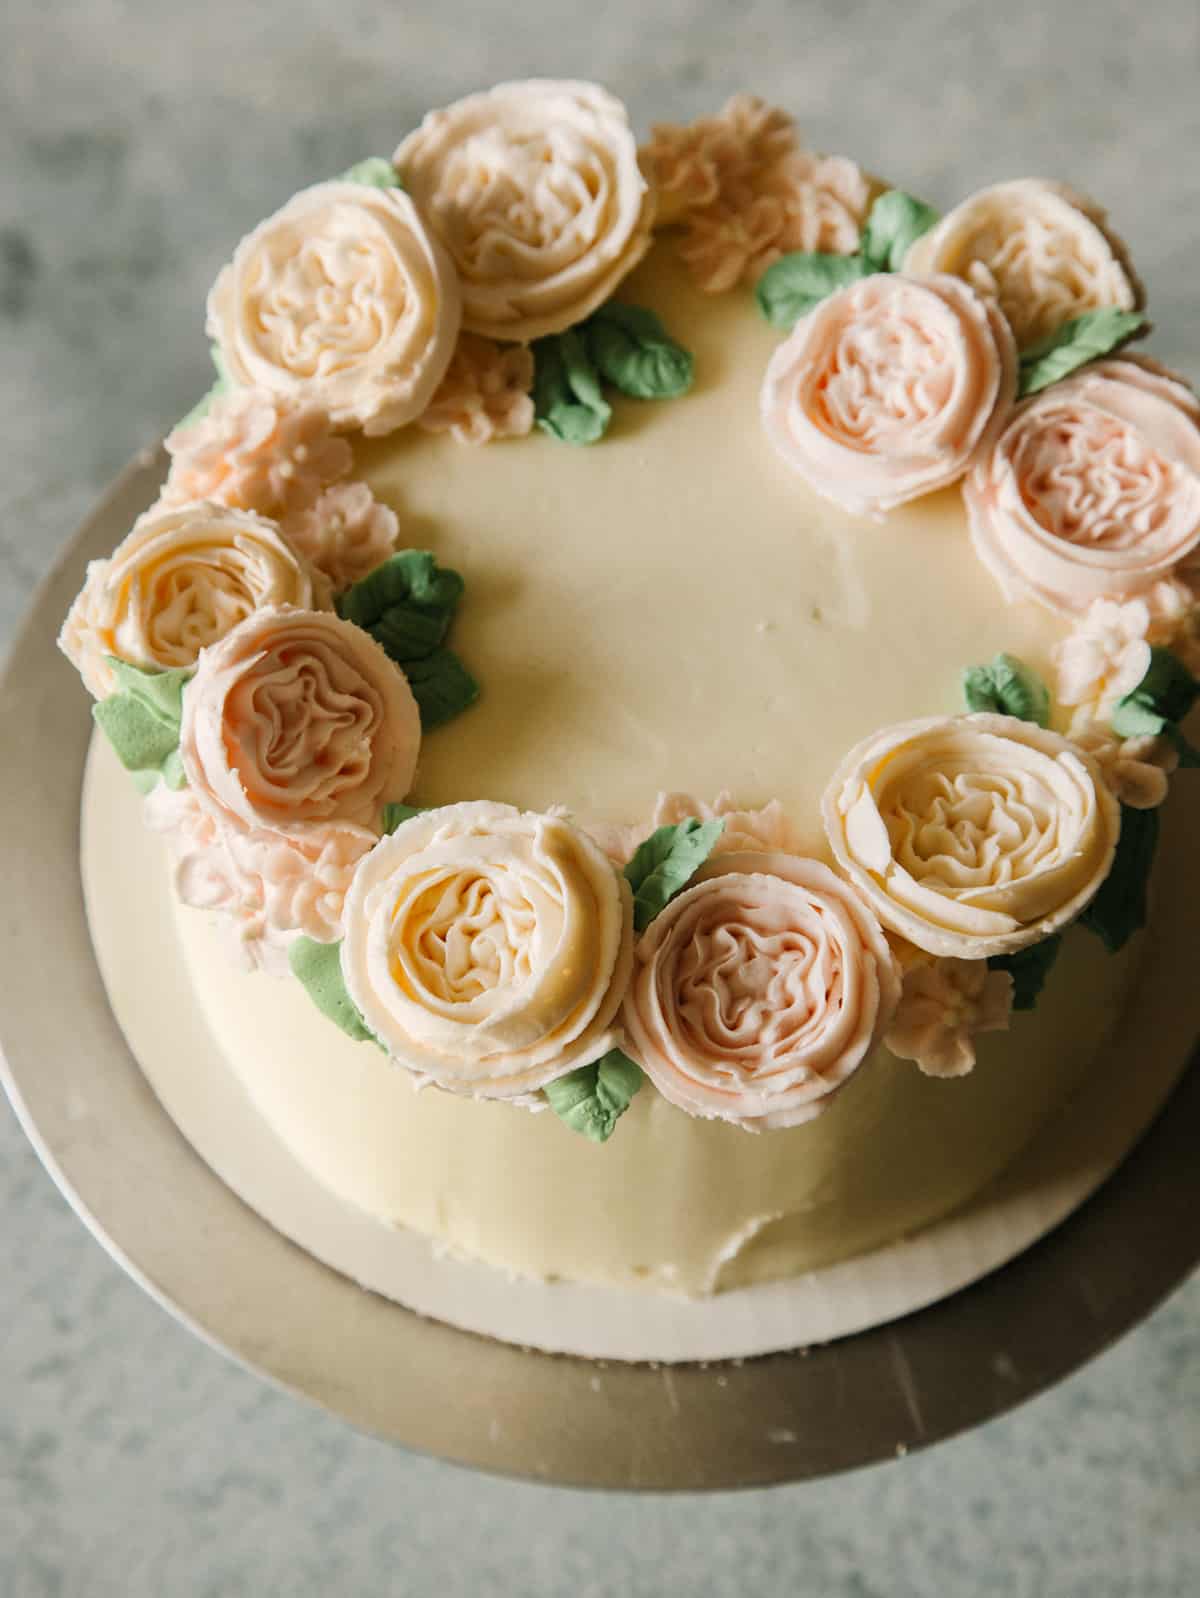
 Yesterday was officially the first day of spring and we’re celebrating with a Floral Wreath Cake!! I’ve gotten really interested in floral piping these last few months, thanks to instagram and pinterest, and have been trying my hand at it and it’s been so fun… a little tricky, but so fun! I’m not the best at it, nor are my flowers anywhere near the quality I’d like them to be at, but it’s become really addicting and the more I practice, the better things seem to look….kind of, ha! Anyway, we have a small ‘non-professional’ tutorial for you guys today because it’s actually easier than it looks, and again, so.much.fun. Plus, who cares if the flowers don’t look ‘perfect’, right? I think it looks nice when each of the flowers (and leafs for that matter) have a little bit of imperfect character to them.
I’ve been using a very basic buttercream recipe for my flowers, which don’t have the best results I don’t think, but overall does a pretty good job and is great to use in the beginning, because it’s super easy to whip up large batches at a time, which is important since you tend to go through a ton as you’re learning and practicing. If you’re not satisfied with the overall texture of the basic buttercream you can also make gum paste and use that or make a real glossy and stiff French, Swiss or Italian buttercream. There are tons of great recipes on the internet and it just takes a quick google search to find them, with our basic buttercream recipe below! :)
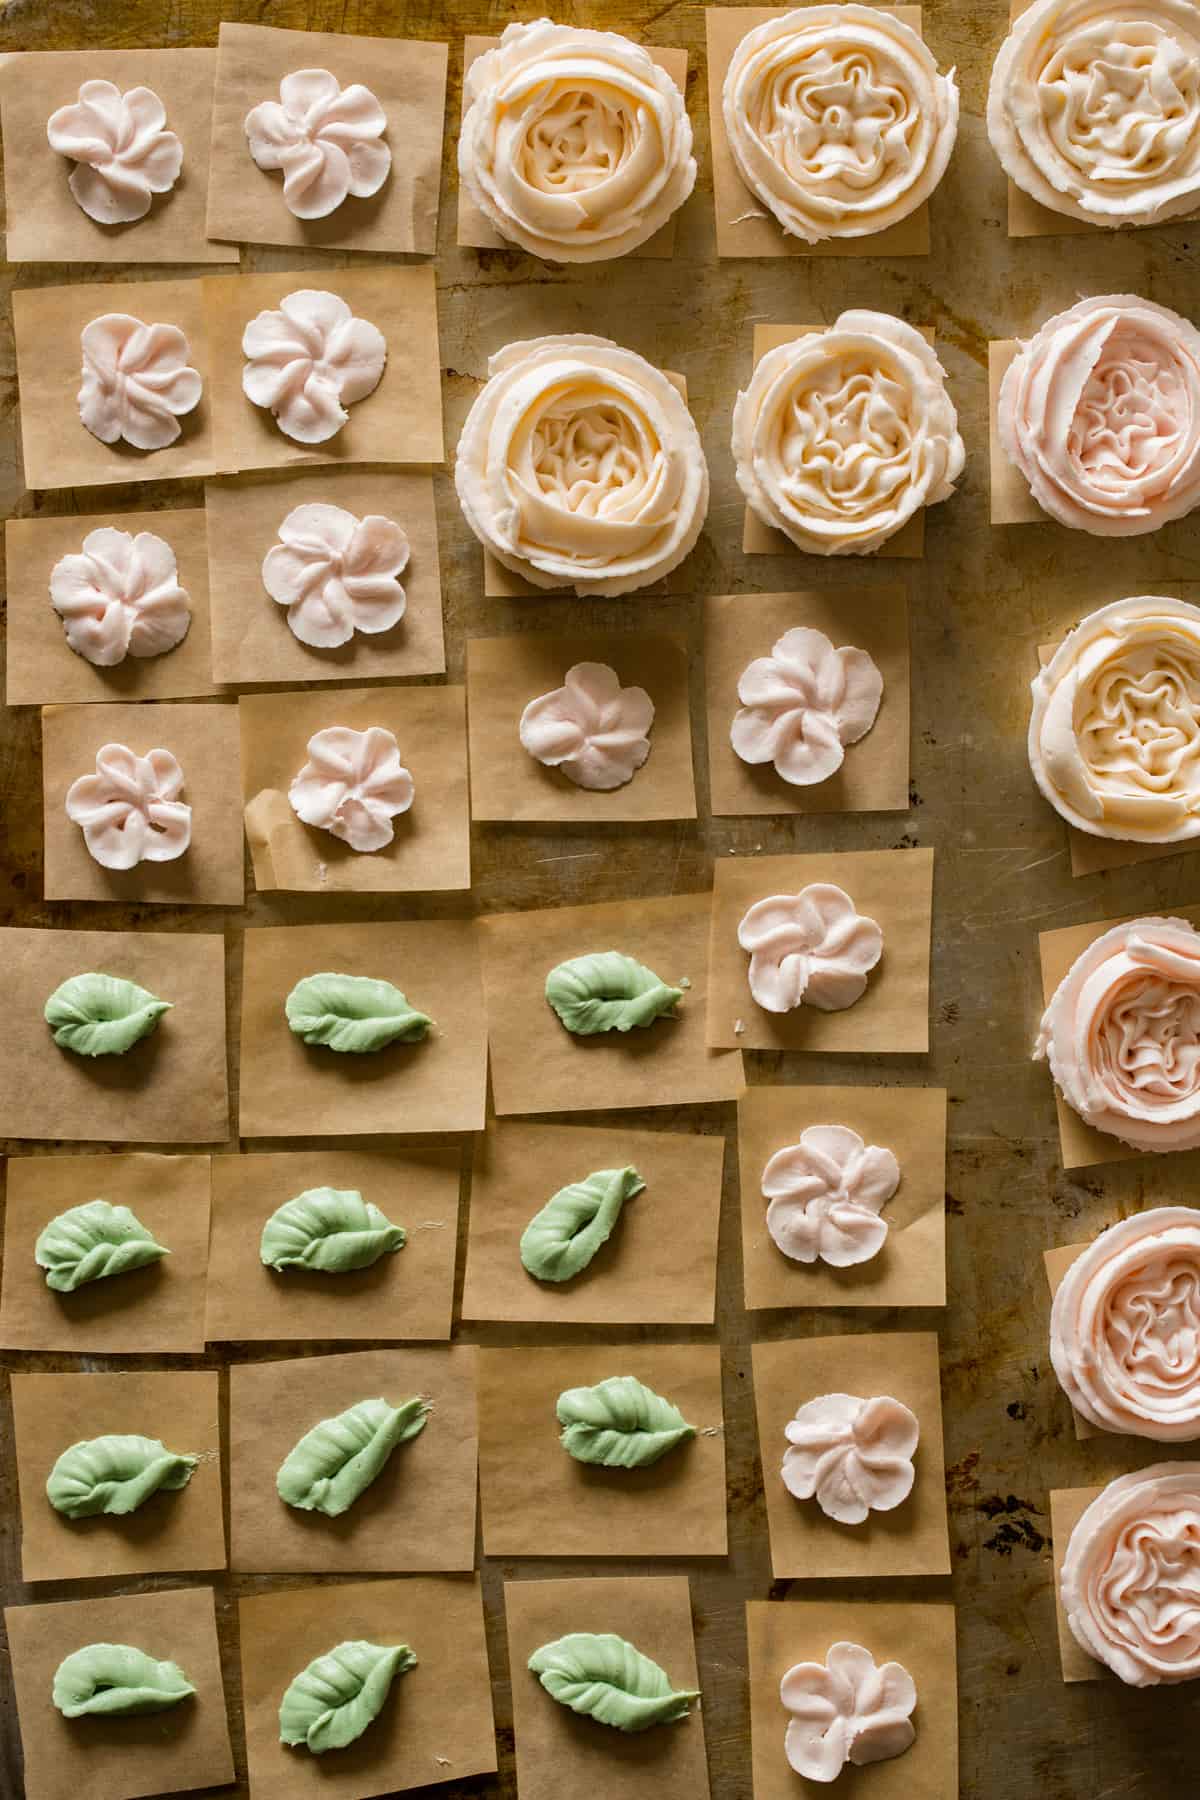
Today we have a small tutorial in the form videos for basic leaves, partially bloomed English roses and apple blossoms. The great thing about piping these three things together is that they all use the same shaped tip, the tear drop tip (ateco #104, #127), with the exception of the apple blossom also using a small round tip (ateco #2). We made a few short videos because for things like this, I always find videos so much more helpful, so you can actually see the movement of the hands and the overall process. In addition to the buttercream and tip, you’ll also need piping bags, couplers (optional, but recommended), a small and large flower nail, small 1″ squares of parchment paper, and larger 2″ squares of parchment paper.
To prep the flower nail for piping, just pipe a small amount of the buttercream onto the top of the flower nail and press the small square of parchment over the buttercream. You can also skip doing this all together if you’re familiar and more comfortable using the scissor method, which is to pipe the flower right onto the stainless, flower nail surface and to then “cut” the finished flower, using scissors, from the flower nail and transferring to a clean, surface. This method is a bit more advanced and only recommended if you know what you’re doing and since I’m totally still learning, I went the parchment square route for safety. Oh also, I’m left handed, but the written directions should make sense for whichever hand you’re using and the videos should help to give you an idea of what you need to do also regardless of what hand you’re using!
-For this basic, small leaf shape, you need the #104 (tear drop) tip
-I colored the buttercream using a tiny drop of leaf green, professional grade food gel coloring mixed with a tiny half drop of brown, professional grade food gel coloring, in about 2 cups of buttercream. I didn’t have the color avocado on hand, but would probably have used that over the leaf green if I had some because it wouldn’t have been quite as bright which is what I was going for. Play around though with different colors and blends until you’re happy with your buttercream colors; just remember that a little goes a long way, especially with the professional grade gels (so when I say “tiny drop” I really mean a dab about the size of a quin).
-In this video you’ll see that the larger end of the tip is held closer towards me at a about 30˚ angle from the parchment paper. As you gently squeeze the buttercream out, you want to pull the tip up into almost a 90˚ angle to form one side of the leaf (the larger end acting as the center). You then turn the bag and tip over to the other side, so the other side of the larger end of the tip is at a 30˚ angle from the parchment paper. Then you want to gently squeeze down in the same 90˚ angle, but the other way, to create the other half of the leaf. The amount and speed at which you squeeze and pipe will determine the look of the leaf and the ripples, or lack there of, you get. Now you have a basic, small leaf! Yay! Using an offset spatula, carefully transfer the leaf and parchment onto a clean baking sheet. Once you’ve piped all your leaves transfer them to the refrigerator to harden completely, at least 1 hour.
Don’t forget, it’s okay if your piping isn’t perfect (mine definitely isn’t..notice the bulge that sort of formed on the second side of the leaf?…yea, that wasn’t supposed to happen but I was squeezing too much buttercream out too quickly). This goes especially true for leaves because when we put the wreath together in the end you’ll be able to tuck small imperfections under some of the flowers, etc.
-For this apple blossom shape, you need the #104 (tear drop) tip and a #2 (small round) tip
-I colored the buttercream using a tiny half drop of rose pink, professional grade food gel, in 2 cups of buttercream. I really wanted a super pale pink/blush color, but again feel free to play around with colors, but use the colors sparingly, unless you want the brightest, neon-ish colored flowers!
-To pipe the apple blossoms you want to start with the #104 tip and start at the same 30˚ angle of the tip to the parchment paper as the small basic leaf, with the larger end of the tip towards you. Although this time you want to twist the flower nail slightly, while you pipe the petals and instead of stopping at the top of the petal (like with the basic leaves in the previous video) you want to twist you hand and continue piping until you’re starting from the same place you began, but on the other side. You wan to to continue the twisting motion a total of five times, to create five petals. Twisting the flower nail will help you seamlessly pipe all the petals for each apple blossom at one time, without stopping and breaking the flow of the flower. Now you have an almost complete apple blossom! Yay! Using an offset spatula, carefully transfer the apple blossom and parchment onto a clean baking sheet. Once you’ve piped all your apple blossoms fill a piping bag with plain white buttercream, fitted with a #2 tip and add three small dots to the center of each apple blossom. Transfer them to the refrigerator to harden completely, at least 1 hour.
-For this Partially Bloomed English Rose shape, you need the #127 (tear drop) tip. I made the mistake of using the #104 tip, which is WAY too small and my roses ended up with petals that were too shallow…so although I’m using a small tip in this video I recommend the #127 tip for a bigger and “fuller” English rose. I also love the partially bloomed look because I think the tight center is really pretty!
– I used the same pale pink/blush color I used for the apple blossoms for some of these roses. I also added a tiny half drop of yellow, professional grade food gel and tiny quarter drop of rose pink, professional grade food gel to create a very, very pale orange…like a barely there orange sherbet color!
-This piping shape is the most complicated one for this tutorial, but overall it’s really not too difficult, once you get the back and forth motion of the center of the rose down. So first you want to create a round base, so using the same 30˚ angle of tip to parchment paper and twisting the flower nail and you pipe, you want to create a small buttercream circle onto the center of the (2″) parchment square. Then holding the tip upright, with the narrow side on top, you want to hold the tip at a 45˚ angle towards the center of the center and pipe a small cone, which is the “center bud” of the rose. Then you want to hold the tip straight, with the narrow end on top, almost touching the center bud and pipe in a “in and out” motion, as you spin the flower nail. You should get five swoops until you reach your starting point. You wan to to repeat this about 4 or 5 times, very closely outlining the piping from before. Now you have your center. At this point you wan to pipe a straight line once around the center, creating a circle around the center of the flower. After the circle has been created, you want create the outer petals be twisting your bag in a half moon motion, going upwards slightly each time you create a petal. This will give your rose some height and depth. After you create two full circles of ‘closed’ petals, you want to bring your piping bag back down to the base and create a final three petals at the bottom, angling the tip in the opposite 45˚ angle (from creating the closed petals) to represent the opening petals. Using an offset spatula, carefully transfer the roses and parchment onto a clean baking sheet. Once you’ve piped all your roses transfer them to the refrigerator to harden completely, at least 1 hour.
Don’t forget, it’s okay if your piping isn’t perfect (mine definitely isn’t..notice the bulge that sort of formed on the second side of the leaf?…yea, that wasn’t supposed to happen but I was squeezing too much buttercream out too quickly). This goes especially true for leaves because when we put the wreath together in the end you’ll be able to tuck small imperfections under some of the flowers, etc.
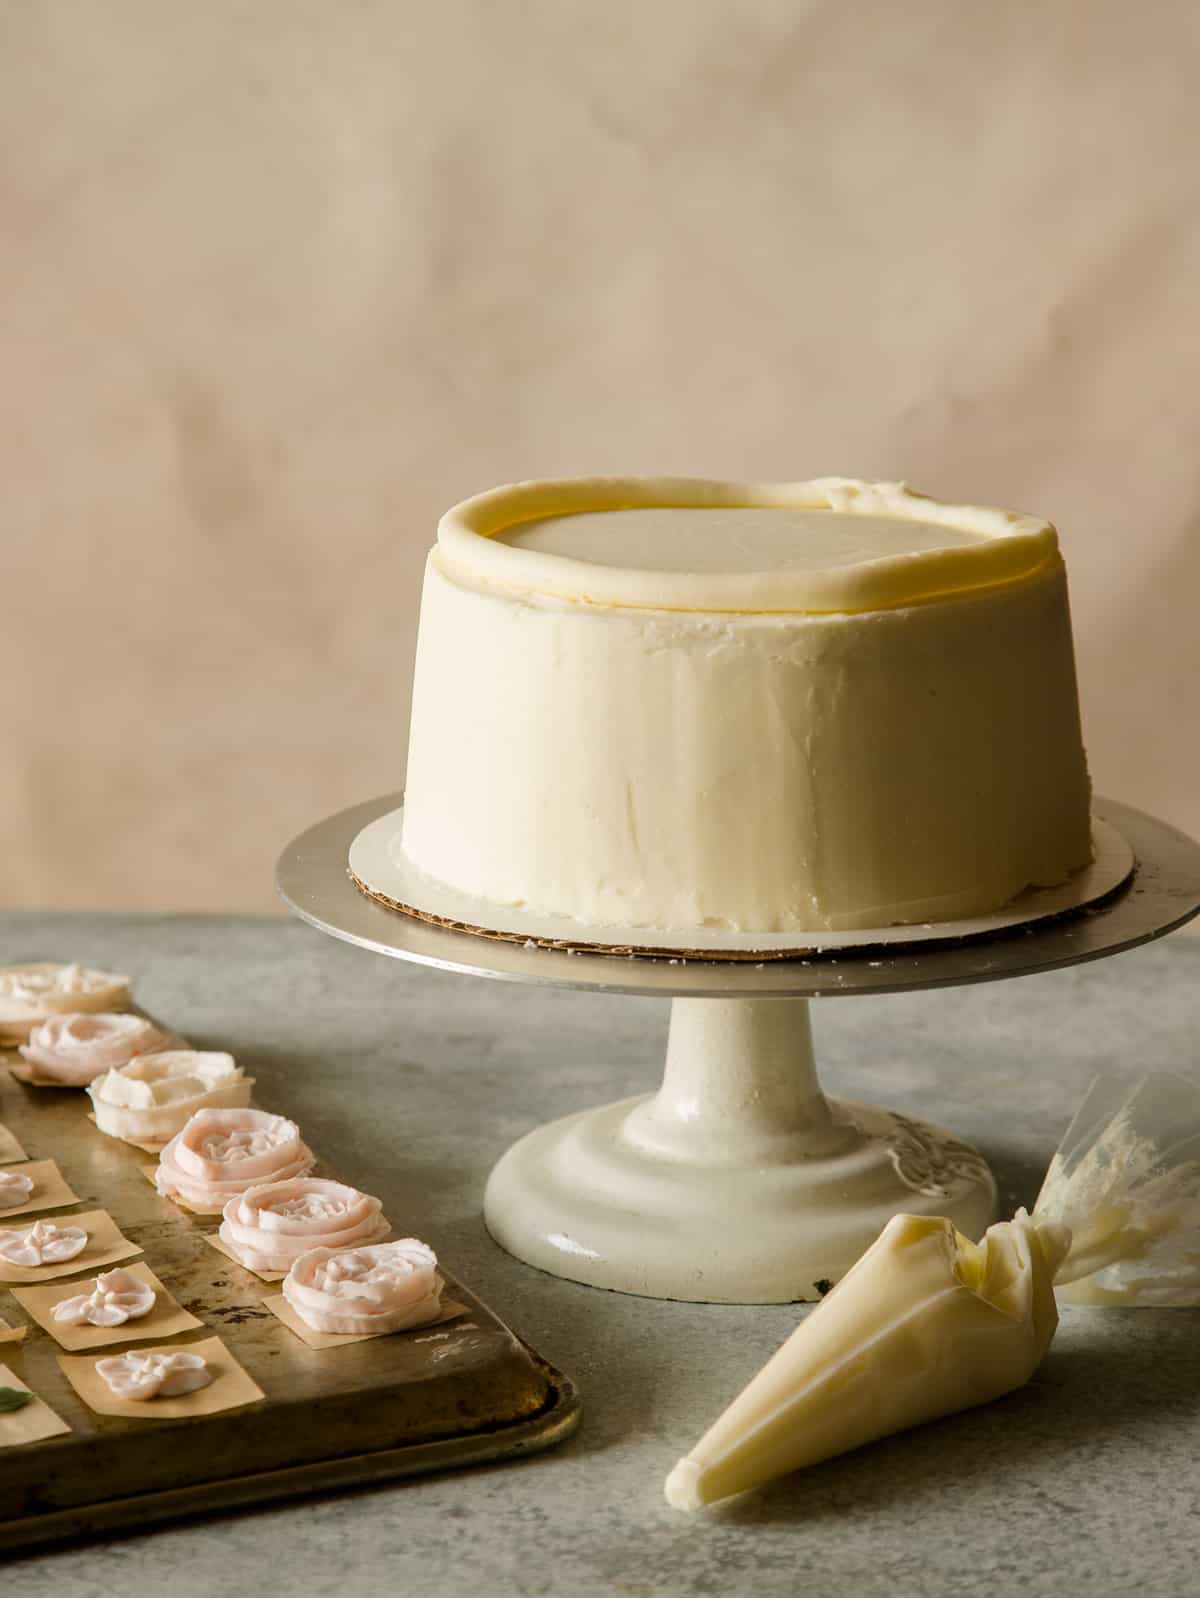
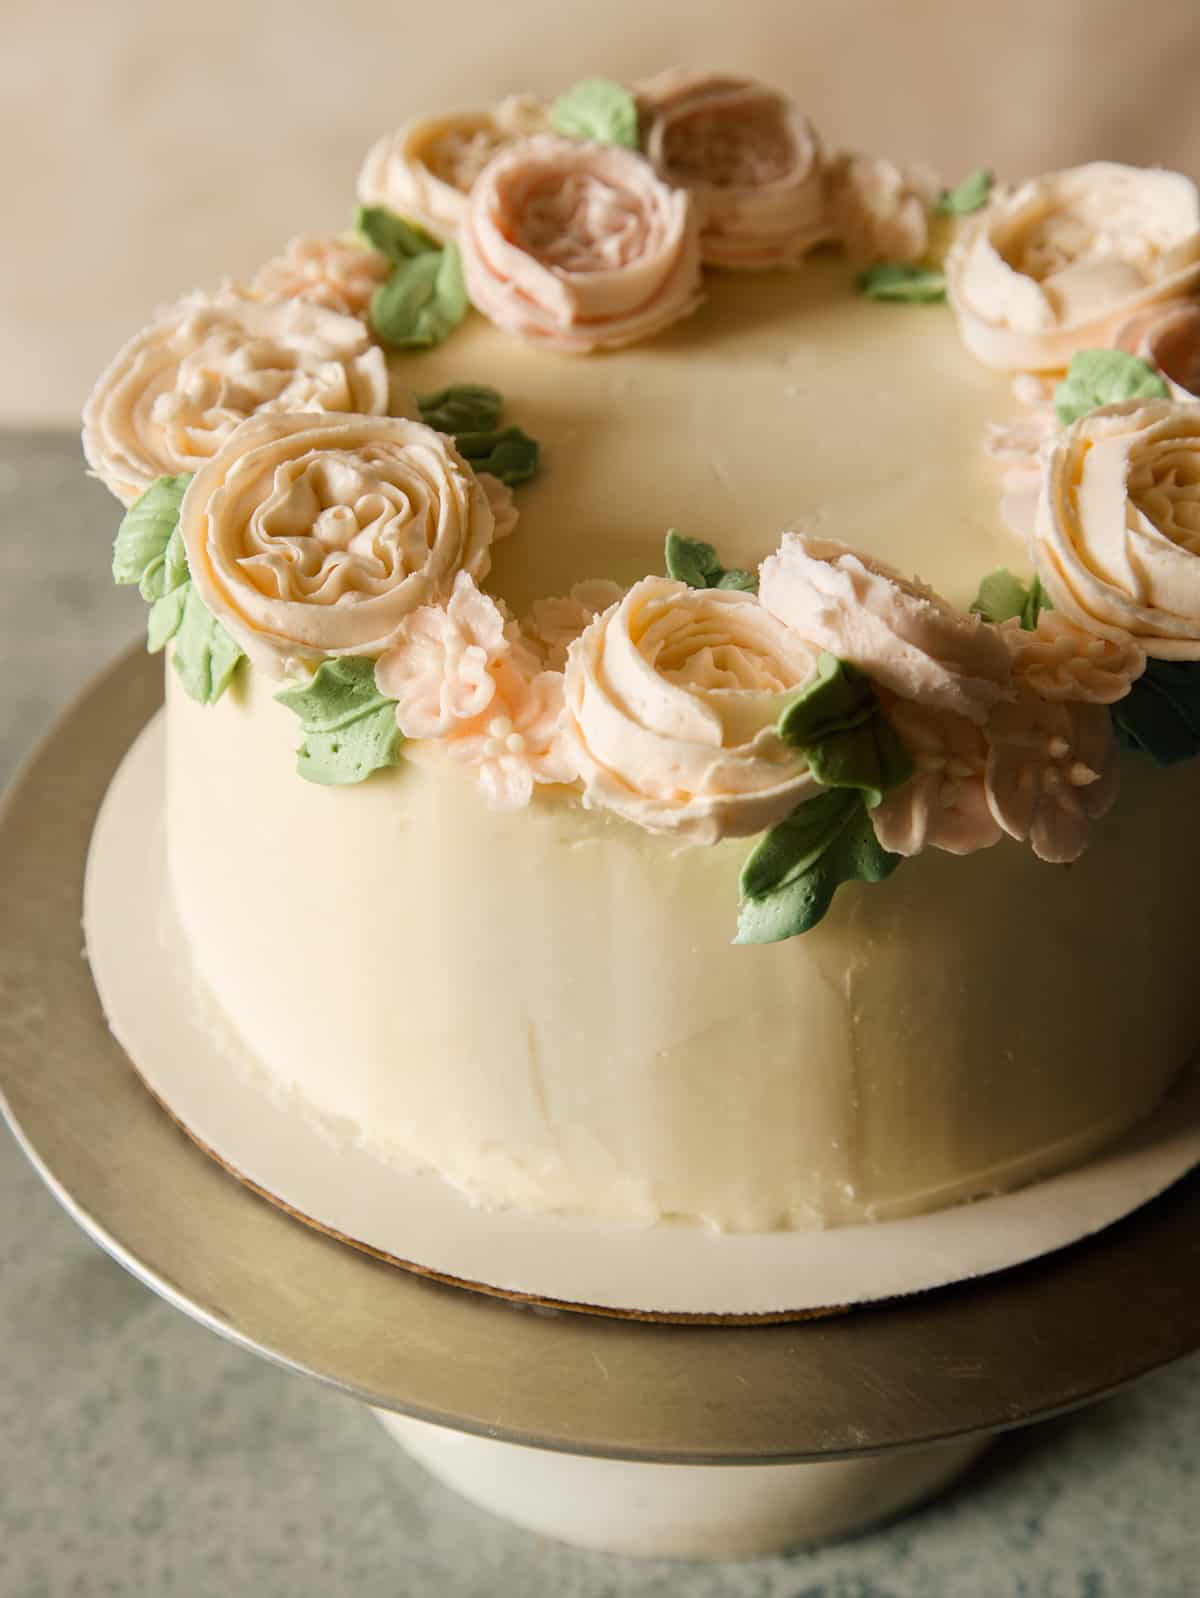
Once your buttercream flowers and leaves have completely hardened and you’ve prepped your cake of choice to your liking, you’re ready to assemble your floral wreath topped cake! We used our devils food cake recipe.
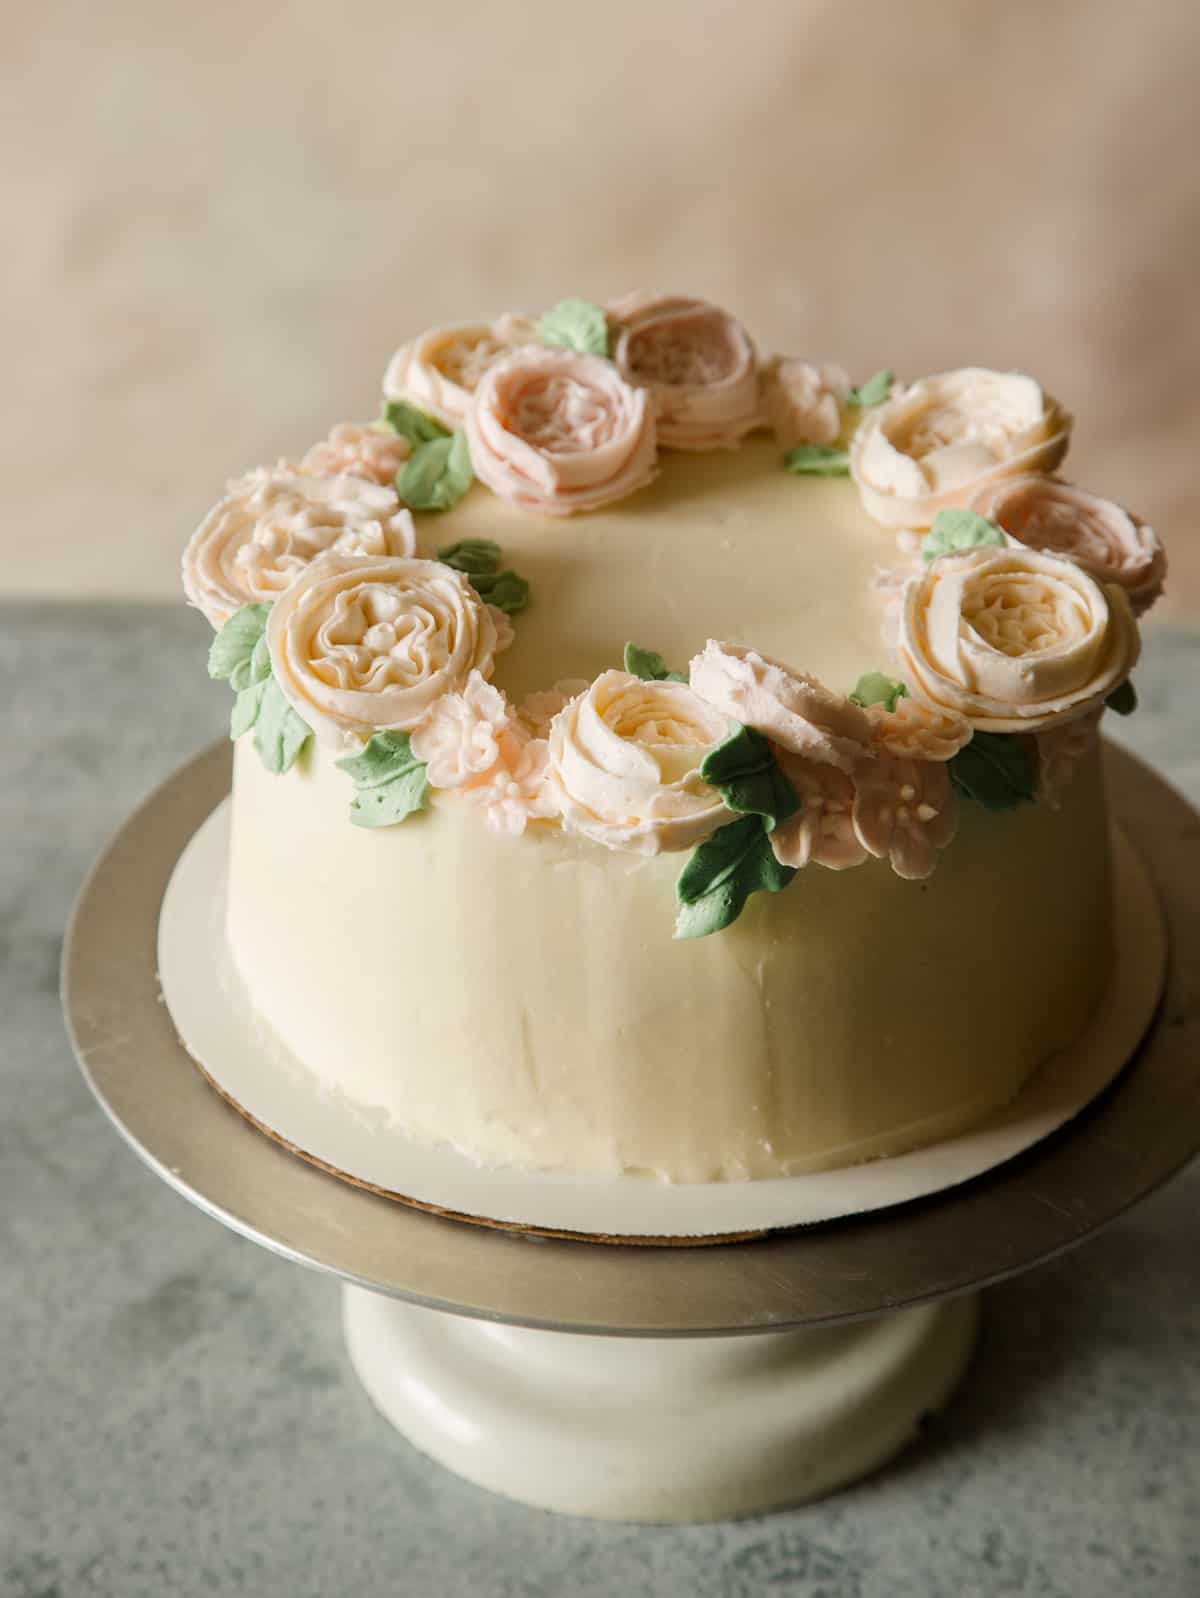
You want to start by piping a thick ring of buttercream around the top perimeter of your cake, so your flowers and leaves having something to adhere to. Once the flowers and leaves have hardened in the fridge you will be able to just peel them right off the parchment squares and place them around your cake. There’s no rhyme or reason to decorating a floral wreath. I was a little random and just sort of went for it, trying to make sure that in the end it would look even and full.
I noticed a few holes and gaps after I finished placing all of my flowers and leaves onto the cake so I simple took my bag of leaf colored buttercream and swapped the tip for a #68 (which is another leaf tip) and just piped some different shaped leaves in the gaps and holes. This isn’t necessary, but I thought it made the wreath look more finished in the end!
I know this all seems a bit daunting, but I think after watching the videos a few times you’ll get the hang of it and trust me when I say this kind of piping gets addicting really fast! I hope you all enjoyed this little floral piping tutorial, resulting in our Floral Wreath Cake! Happy Spring! Enjoy!! xx, Jenny
If you love decorating with frosting as much as we do, here are some other recipes you might like:
- Lime Sugar Cookies with Pineapple Buttercream
- Cactus Butter Cookies
- 4th of July Funfetti Cake
- Devils Food Cake with Real Strawberry Frosting
Floral Wreath Cake – Basic Piping Buttercream
INGREDIENTS
- 1 cup (2 sticks) unsalted butter, softened
- 2 tablespoons shortening
- 3 ½ cups sifted powdered sugar
- ½ tablespoon heavy cream
- 1 teaspoon vanilla extract
INSTRUCTIONS
- In a stand mixer, fitted with a paddle attachment, beat together butter and shortening until light and fluffy.
- Add powdered sugar, ½ cup at a time and continue to beat together.
- Scrape down sides of the bowl and add cream and vanilla. Beat until light and fluffy.
NOTES
- *nutritional information for 1 recipe
Did you make this recipe? We want to see!
tag @SpoonForkBacon and #SpoonForkBacon on Instagram
Wow, BEAUTIFUL!!! It has also inspired me to break out the old Wilton bags too. I always love the look of fancy cakes (not a big fondant lover) so this is great for me!! Thank you so much for the tutorials!!
What a gorgeous cake and thanks for sharing such awesome tips!
Oh my goodness this is gorgeous! Legit wedding cake status.
I’m making this for my birthday next month. I always want to mess around with buttercream flowers but never seem to have time. I think I’ll make it happen this year. Thanks! Love the videos.
Yay! I know, I totally get it. I’ve been meaning to get into this for years now! I guarantee though that once you actually do get all the supplies and actually hunker down to start piping, you’ll be glued to your seat for hrs…if not days…too fun! :)
I did it and it turned out beautifully. Thanks for the inspiration and tutorial. I posted a pic on my blog (with credit to you of course).
Oh yay, this makes me so so happy ! Can’t wait to check it out!!
This has inspired me to make a decorated cake for Easter. I can’t wait!
Yes!! That makes me incredibly happy!
That is absolutely beautiful! Stunning.
Thank you!!
That’s gorgeous! I bought a piping bag two weeks ago and could really use some practice. Thanks for adding the basic buttercream too, I think that’s where it went wrong last time…
I’ve saved this and really hope to get practising soon!
Thank you! Yes, the buttercream mixture is so important! I was making mine way too stiff got such a long time!