


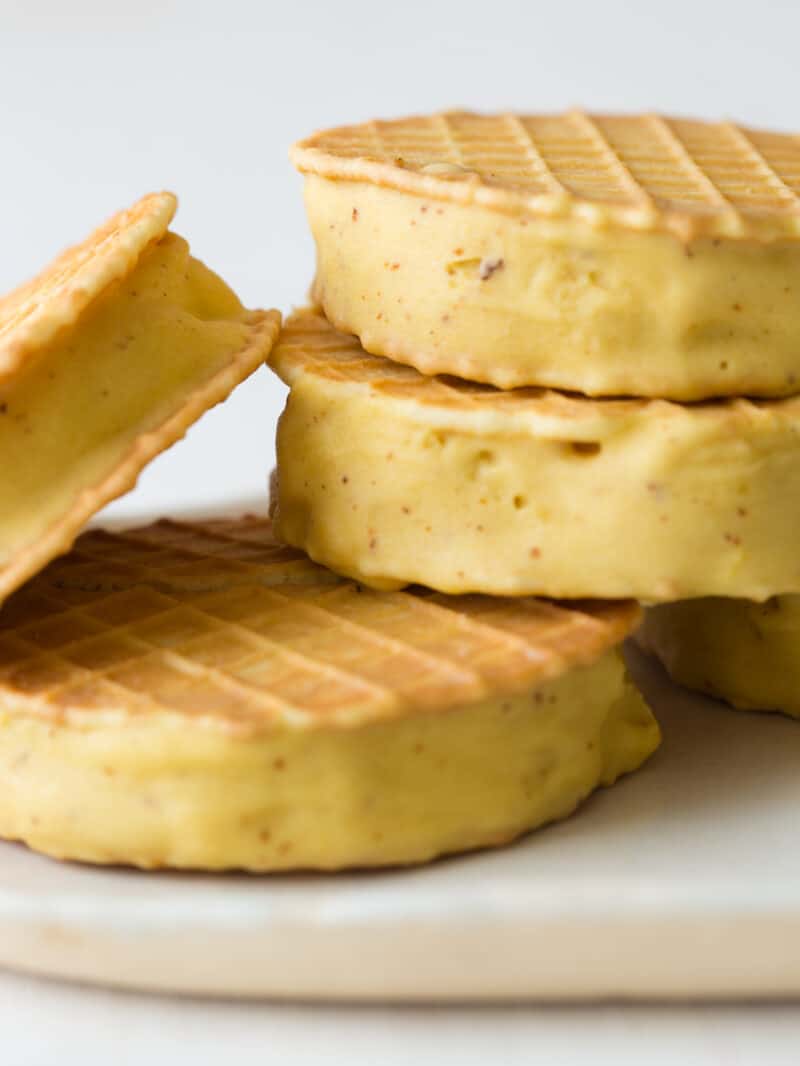
 Today we have two super simple recipes for homemade ice cream cones! I love a good waffle and sugar cone, but it’s hardly difficult to make at home. If I’m feeling particularly lazy, I’ll put the freshly baked/pressed discs into cupcake tin holes to make ice cream cone bowls. A few things to know about making your own ice cream cones, for the waffle cone recipe you’ll need a waffle cone maker…if you don’t have one no worries, you can make the sugar cone recipe which is super tasty!
For the sugar cones, I’ve created a stovetop version. You can totally bake these if you’re more familiar and comfortable with that method (350°F for 5 to 7 minutes), but I have found that the cones cook more evenly and stiffen better when cooked on stovetop. I’m not going to lie, although the recipe and method is easy, you need a bit of patience to make your own ice cream cones as you need to make them one by one because they harden super fast. The towel you lay the hot discs onto is super important as you’ll burn you hand pretty bad if you don’t use it to help you roll the cones. One last important tidbit of information is that it’s important for the skillet to be cooled each time you add the sticky batter to allow it to spread easily and evenly. Oh! I Lied! There’s one last super important thing about making your own cones, dipping them in chocolate after they cool. This will totally help prevent major drippage once your ice cream begins to melt.
If you’re feeling a little adventurous and up for the task I recommend making these homemade ice cream cones. They’re really delicious and you’ll feel completely accomplished after you do! Xx, Jenny
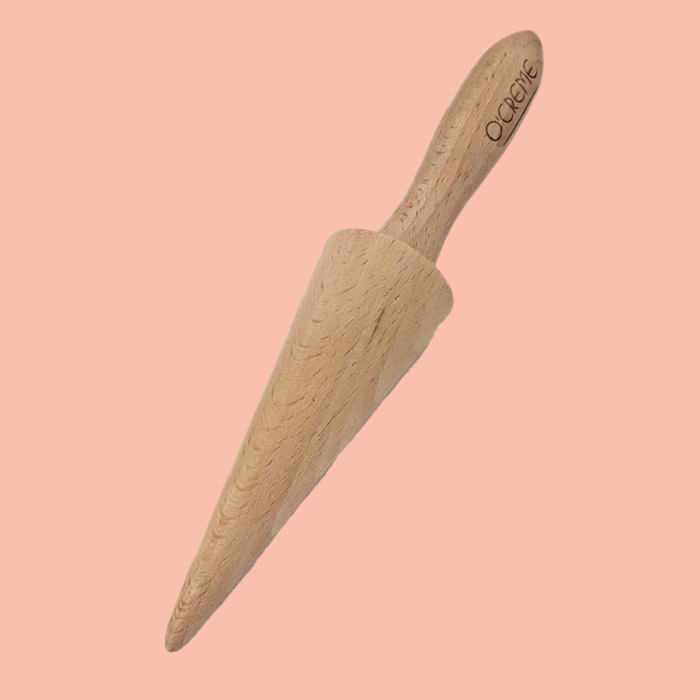
Here are the tools we like for this recipe. Usually the waffle cone iron comes with the plastic waffle cone mold like the one we use in the pictures. The smaller metal one we use is the same size as the wood cone mold lined below.
Other yummy ice cream recipes you might like:


Homemade Ice Cream Cones
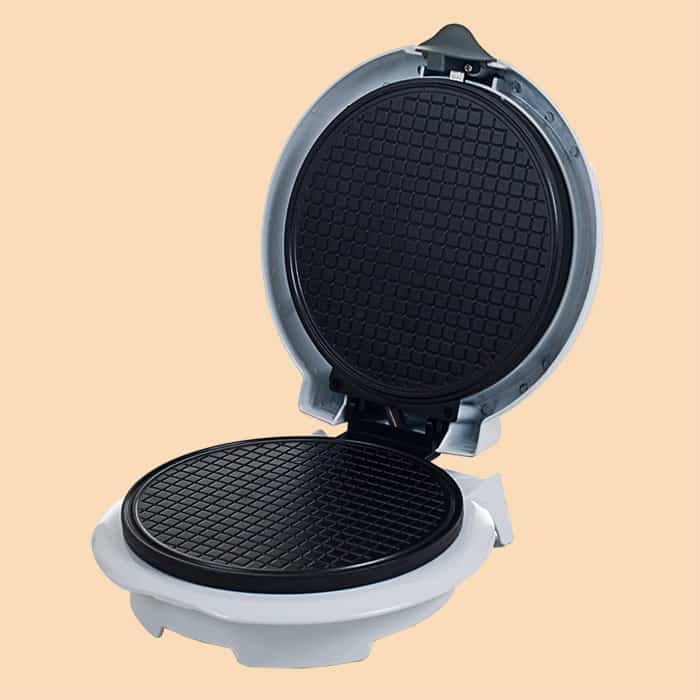
EQUIPMENT
- cone rollers
- waffle cone maker
INGREDIENTS
stovetop sugar cones
- 2 large egg whites
- ½ cup superfine sugar
- 3 tablespoons whole milk
- ½ teaspoon vanilla extract
- pinch salt
- ⅔ cup all purpose flour
- 2 tablespoons unsalted butter, melted
waffle cones
- 1 egg
- 1 egg white
- ¼ teaspoon salt
- ¼ cup plus 1 tablespoon superfine sugar
- ½ cup plus 2 tablespoons all purpose flour
- ¼ cup (1/2 stick) unsalted butter, melted
- 2 tablespoons whole milk
- 1 teaspoon vanilla extract
for dipping
- melted semisweet or dark chocolate
INSTRUCTIONS
Stovetop sugar cones
- Place egg whites, sugar, milk, vanilla, and salt into a mixing bowl and whisk together.
- Stir in flour and butter until fully incorporated and batter is smooth.
- Lightly spray a nonstick skillet with a small amount of cooking spray. Pour 2 ½ tablespoons batter into the cold skillet and spread into a thin even layer.
- Place skillet over medium heat and cook for 4 to 5 minutes or until base has set. Flip and continue to cook for 1 to 2 minutes.
- Quickly lay sugar disc onto a clean towel and top with cone roller.
- Using towel and cone roller, roll sugar disc into a cone shape and hold, seam side down for 1 to 2 minutes or until cone cools and hardens. (this must be done quickly as the disc will begin to harden almost immediately after leaving the skillet). Cool skillet and repeat until all batter has been used.
- Cool cones completely before dipping the tips in chocolate and setting on parchment until the chocolate hardens. Carefully store in an airtight container for up to three days.
Waffle cones
- Pour all ingredients into a mixing bowl and whisk together until no lumps remain. Allow mixture to sit for 5 minutes.
- Heat waffle cone maker to desired settings.
- Pour 3 to 3 ½ tablespoons batter into the center of the waffle cone maker and gently press lid closed, completely. Cook waffle cones for 4 to 4 minutes or until golden brown.
- Quickly lay waffle disc onto a clean towel and top with cone roller. Using towel and cone roller, roll waffle disc into a cone shape and hold, seam side down for 1 to 2 minutes or until cone cools and hardens. (this must be done quickly as the disc will begin to harden almost immediately after leaving the skillet). Cool skillet and repeat until all batter has been used.
- Cool cones completely before dipping the tips in chocolate and setting on parchment until the chocolate hardens. Carefully store in an airtight container for up to three days.
Did you make this recipe? We want to see!
tag @SpoonForkBacon and #SpoonForkBacon on Instagram
What is a sugar disc and cone roller
Could I lay this stovetop cone over a small dish to create a bowl? I don’t have a cone roller. Other options?
yes! That’s actually a fantastic idea!
Do you have to use a nonstick pan? We only use cast iron and stainless steel and do not have any nonstick pans.
nice
I made this sugar cone and it was so delicious….my children couldn’t stop asking for it. I made it the pan and it worked perfectly! Crispy and a beautiful brown colour. I will never buy a sugar cone again. Thank you for this amazing recipe!
It calls for an egg and a egg white. So two eggs total? Do you whip the egg white before folding in?
Yes, two eggs total, one whole egg and one egg white. There’s no need to whip the whites and fold them into the mixture. Everything can be combined into a mixing bowl at once and whisked together.
Thank you!
Is it possible to rather use brown sugar? It’s more gentle on my IBS.
Hm, i haven’t tried it before, but i don’t see it being a problem to swap in brown sugar for this recipe
Do you happen to know how many calories this recipe includes?
I have a waffle bowl maker. Could I still use the recipe for the waffle cone for my waffle bowl maker? Also, can you make batter ahead of time and use when needed?
Yes, you may just need to adjust the amount of batter you use for each bowl. The batter can also be made up to 3 days ahead of time and stored in an airtight container, in the refrigerator.
Hi Jenny Park, Can you let me know what to do when you take it out of the refrigerator? Do you need to wait a while? Add additional liquid? Thanks for your guidance. <3
Hi Ruthy! If you’re using a waffle cone maker, there’s no need to wait or add additional liquid to the batter. The same applies to the stovetop version, unless you find your batter has thickened to the point of making it difficult to handle (spread). If that’s the case, you can add an additional 1-2 tablespoons of milk or water to the batter or until you have a consistency that’s easily poured and spreadable. Hope this helps!
Hi Jenny Park, Thanks so much for responding. The waffle cone recipe I used wasn’t yours and I had no success with it. I came to your blog searching for a solution, so thanks to your guidance, I will try your recipe next. There are a number of differences with your recipe including that yours used superfine sugar and not icing sugar, so that could be the key to success. I’m hopeful!! Thanks once again.
Just Stop buying from store because I already learnt from this recipe. Thanks a lot
I like the waffle cone
Just came across this; really clever. Would love to kick the habit of buying them in store, haha – thanks for the recipe!
Unfortunately something is wrong with the recipe. I followed this recipe using my waffle maker and it didn’t turn out was more like a thick tortilla and batter was too thick. Nothing like the picture. There’s something missing!?
Yea, you shouldn’t use a waffle maker for this bc the grooves are way too deep! Unfortunately it needs to specifically be a waffle CONE maker. Since we know not everyone has one, we gave stovetop directions, so you can still make homemade cones! :)
I used a waggle maker and turned out perfect!
it takes less than a minute to brown. I experimented with different times to get the right color I want.
This recipe sounds wonderful, however will they remain crispy for a few days?
Yes, if stored in an airtight container and stored in a cool, dry place
Can these be made with gluten free flour and dairy free margarine?
I’m actually not too sure bc i haven’t tried a version with those ingredients. Sorry about that!
Nice cones. I will try some of them out myself.
Honestly, it looks fabulous. I’ll surely try your way to make these cones.
Hi, Jenny,
Can the recipe for sugar cones be used in a waffle cone maker also?
Honestly, I’ve never tried it so I’m not sure. There’s more sugar in that version and I’m not sure if that would effect the cooking/pressing at all? (Since you have a bit more control stovetop)