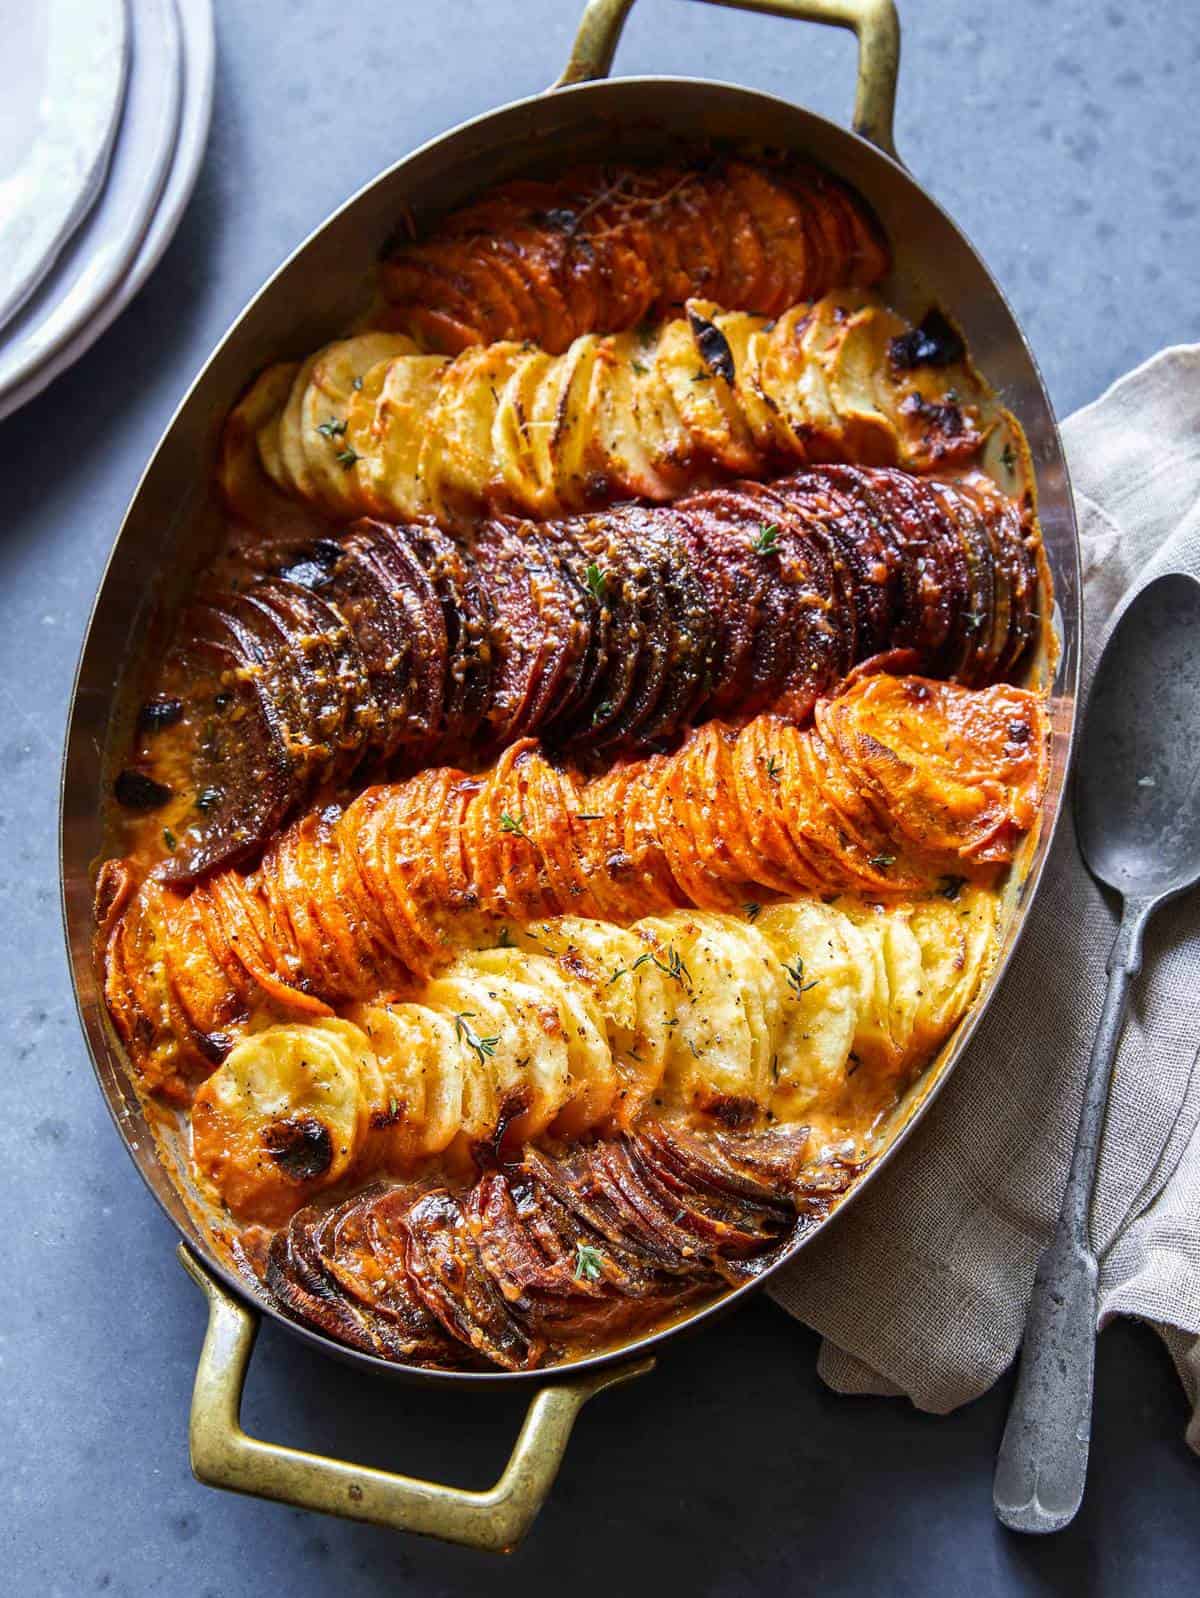
This Cheesy Root Vegetable Gratin might be one of my absolute favorite recipes ever for fall and winter. It’s equally as delicious as it is beautiful and always a crowd favorite as well.
I love the subtly sweet and earthy flavors of this combination of root vegetables mixed together with the savory and salty shredded gruyère cheese, garlic, thyme, and heavy cream. It’s the perfect side dish to any thanksgiving or holiday meal, or really any cozy meal!
How to Make Our Root Vegetable Gratin
Ingredients
Process
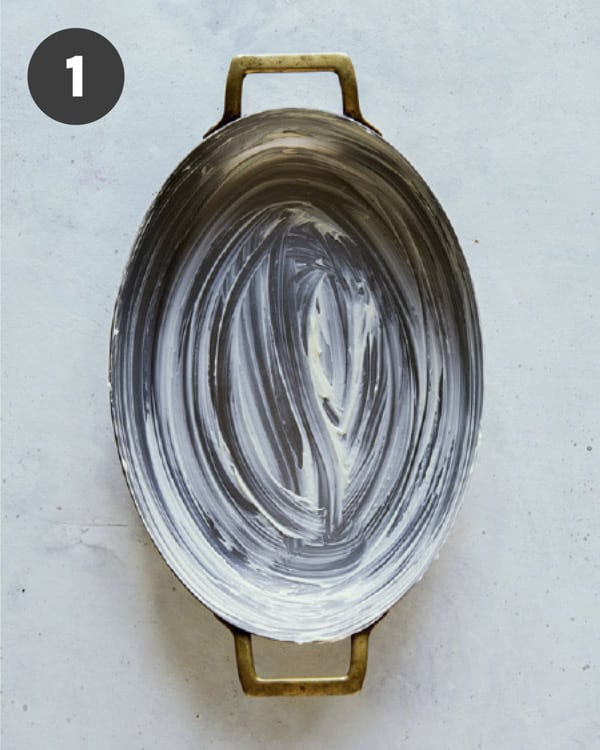
- Preheat oven. Grease baking dish with butter.
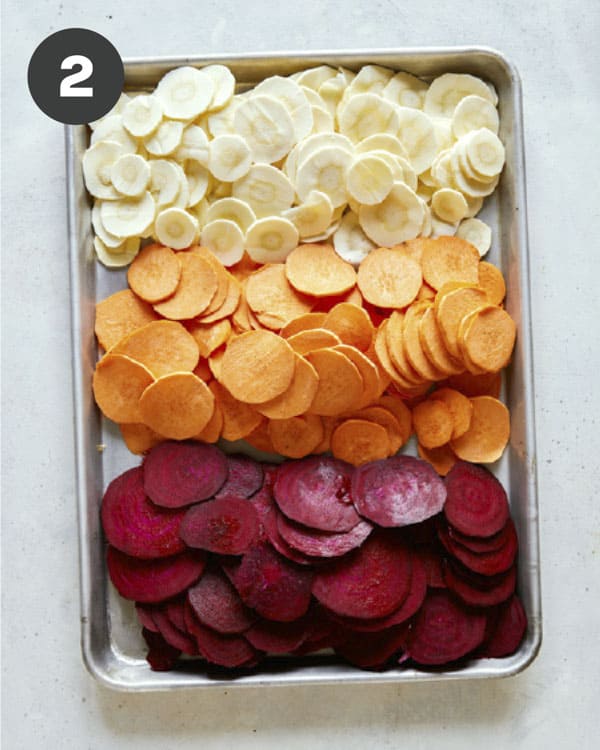
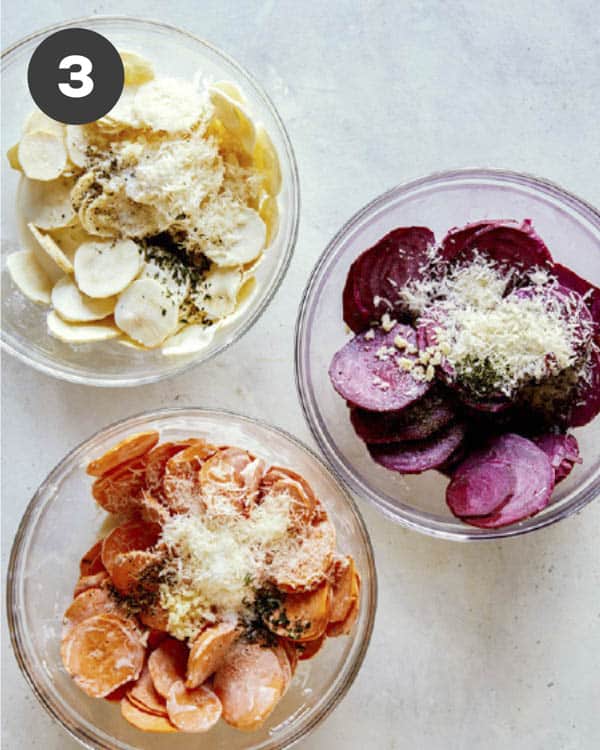
- Slice sweet potato, parsnips and beets into very thin rounds (using a mandoline is easiest).
- Transfer each vegetable to its own bowl and add heavy cream over each sweet potatoes and parsnips, and beets. Top each bowl of sliced vegetables with some grated Parmesan cheese and some minced thyme. Season each bowl generously with salt and black pepper and toss together until all vegetable slices are well coated.
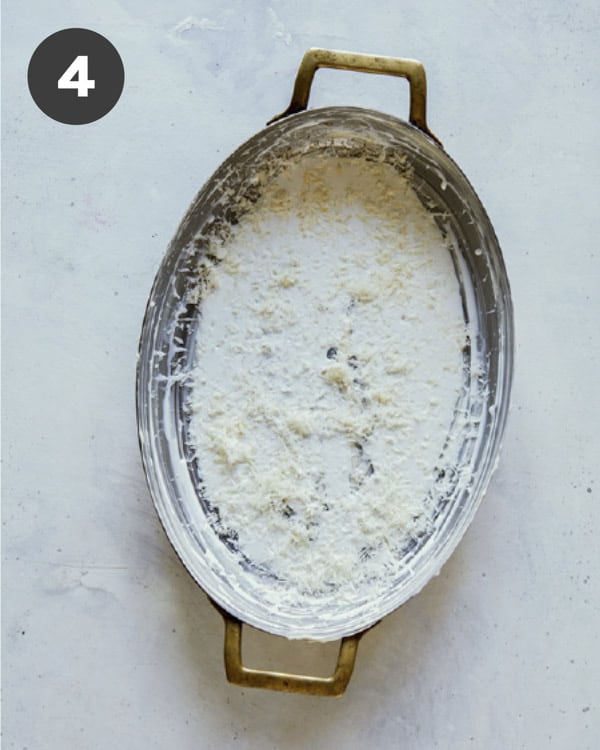
- Pour remaining heavy cream into the greased baking dish and sprinkle with Parmesan and garlic.
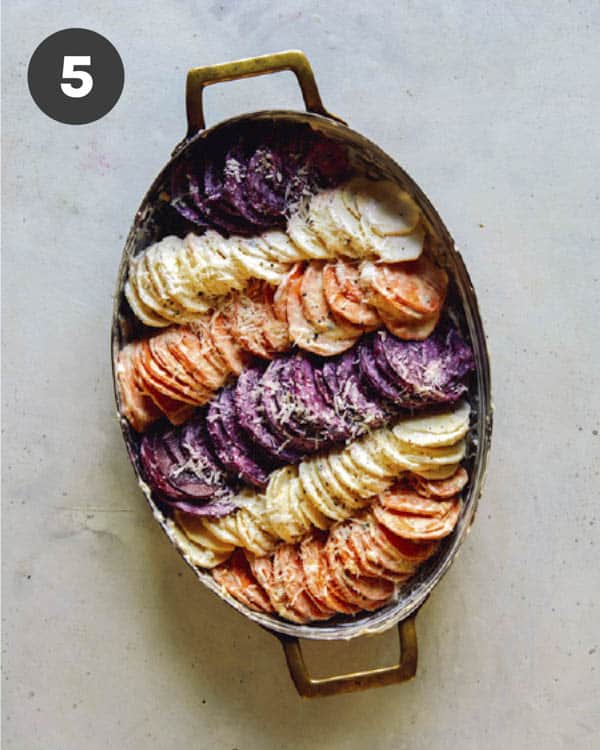
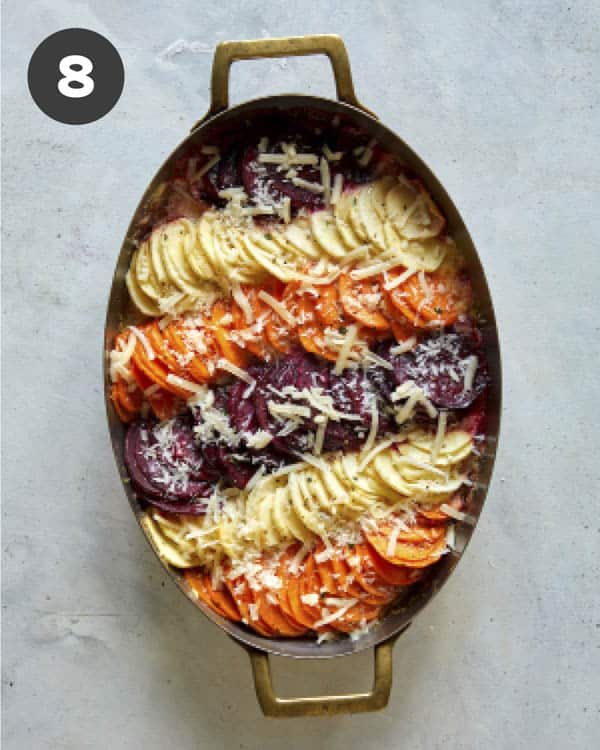
- Grab a stack of sweet potatoes and line them standing up on a bias, at the top of the casserole dish. Follow the sweet potatoes with a row of parsnips, followed by a row of beets. Repeat with the remaining sweet potatoes, parsnips and beets, creating 6 rows of root vegetables. Season top of gratin with salt, black pepper and sprinkle of remaining Parmesan.
- Cover with aluminum foil and bake until vegetables are soft.

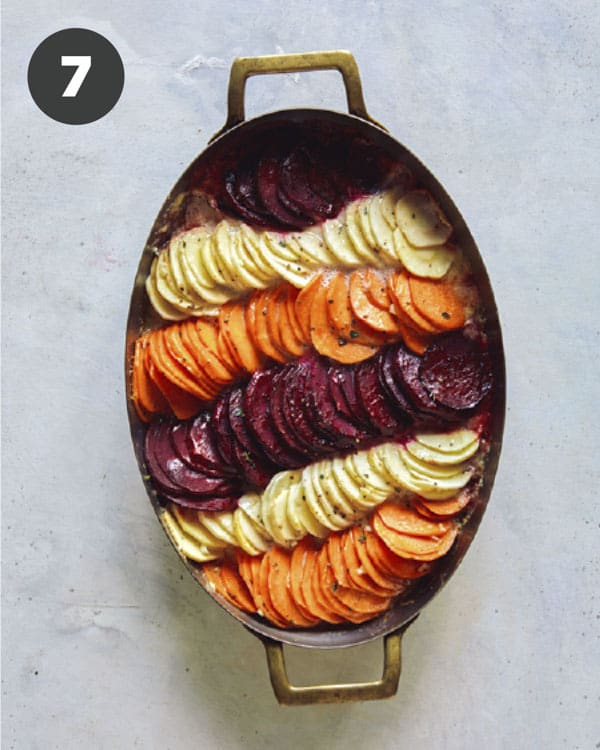
- Uncover gratin.
- Top with shredded gruyère. Place gratin back into oven, uncovered, and continue to bake until vegetables are fork tender, cheese has melted and the top has lightly browned. Finish cheesy root vegetable gratin with a sprinkle of fresh thyme leaves. Serve.
Tips and Tricks for Cheesy Root Vegetable Gratin Success
- The aluminum foil should be tightly wrapped around the baking dish to allow the dish to steam a little and for the vegetables to get tender before uncovering it.
- Wear gloves when handling beets to prevent them from staining your hands. If you do stain your hands, wash them with a blend of baking soda and warm water and vigorous rub them together. You may need a couple rounds of this process to completely remove the stains.
- Keeping the slices as uniform in thickness as possible will greatly help even cooking throughout the gratin.
- Using a mandoline will not only ensure even thickness, but will also reduce the prep time. If you don’t have a mandoline a very sharp knife is the next best thing we recommend.
- Covering this dish in the beginning will allow the vegetables to soften without drying the dish out. Once the vegetables get to a good point, uncovering them will allow the top of the gratin brown and crisp up, while allowing some of the excess liquid to thicken/evaporate.
Tips for Preventing the Beets From Bleeding onto the Entire Root Vegetable Gratin
Although not entirely preventable (because some beets naturally release more juices then others), we have a few tips to prevent the beets bleeding through too much of the overall dish.
- Ensure all the vegetables are coated in cream so they don’t dry out. The beets should just be barely coated in cream because too much cream coating will result in them bleeding through the root vegetable gratin.
- You also want to make sure the bottom layer of your baking dish is just coated with a thin layer of cream and sprinkled with Parmesan. The amount of cream used may vary just a little bit, depending on the surface area of the baking dish you’re using, so it’s best to eyeball this.
Make Ahead Instructions
This dish can be made up to a day ahead of time and refrigerated, tightly wrapped in foil. When ready to bake, just place the covered gratin in the oven, adding about an extra 5-7 minutes of baking time to the dish (covered).
Just know that if you prep this dish ahead of time, you run the risk of the beets bleeding from sitting in the cream. This won’t effect the flavor at all, but it’ll change the look of this dish.
Figuring Out Exactly How Many of Each Vegetables You Will Need
We add a small range for each vegetable because not all 3 quart baking dishes are oval and we encourage you to use what you have on hand (which would change the amount of surface area there is).
This plus the fact that the thickness of the sliced vegetables, the size of each vegetable themselves, and the degree of the bias in which the sliced vegetables are placed into the baking dish will all vary slightly from person to person, effecting the number of vegetables needed for our root vegetable gratin.
**The nutrition facts are based on the lowest number vegetables in each range in the ingredient list. **

Variations for Cheesy Root Vegetable Gratin
- Chives, green onion, sage, and rosemary or a combination of herbs make a great alternative to the fresh thyme.
- Shredded fontina, Swiss, comté, gouda, and mild cheddar cheese all make great cheese alternatives for gruyere.
- Whole milk or half and half can be used in place of cream, although there will be more liquid pooled in the bottom of the gratin after it’s baked.
- Turnips and rutabaga make great root vegetable alternatives for any of the three used in this recipe.
What to Serve with Our Cheesy Root Vegetable Gratin


If you’re looking for other delicious thanksgiving or holiday side dishes, you can head on over to our Holiday Headquarters for some of our favorite ones! Enjoy!

Cheesy Root Vegetable Gratin
INGREDIENTS
- 1 tablespoon unsalted butter softened
- 1-2 long sweet potatoes (about 2 inches thick), peeled
- 3-4 large parsnips, ends trimmed and peeled
- 3-5 small beets, peeled
- 14 tablespoons heavy cream, divided (whole milk is fine, but mixture won't thicken as much or be as creamy)
- 4 ounces grated Parmesan, divided
- 1 tablespoon fresh minced thyme, divided plus more for garnish
- 1 garlic clove, minced
- 1 ounce shredded gruyere
- salt and pepper to taste
INSTRUCTIONS
- Preheat oven to 400˚F. Grease a 3 quart baking dish with butter.
- Slice sweet potato, parsnips and beets into very thin rounds (using a mandoline is easiest) and transfer each vegetable to its own bowl.
- Pour 4 tablespoons cream over each sweet potatoes and parsnips, and 2 tablespoons cream over beets. Top each bowl of sliced vegetables with ½ ounce grated Parmesan and 1 teaspoon minced thyme. Season each bowl generously with salt and pepper and toss together until all vegetable slices are well coated.
- Pour remaining 1/4 cup cream into the bottom of a 3 quart (oval) baking dish and sprinkle with ½ ounce of Parmesan and minced garlic.
- Grab a stack of sweet potatoes and line them standing up on a bias, at the top of the baking dish. Follow the sweet potato with a row of parsnips, followed by a row of beets. Repeat with the remaining sweet potatoes, parsnips and beets, creating 6 rows of root vegetables.
- Season top of gratin with salt, pepper and sprinkle of remaining Parmesan.
- Cover with foil and bake for 30 minutes or until vegetables are soft.
- Uncover gratin and top with shredded gruyere.
- Place gratin back into oven, uncovered, and continue to bake for an additional 18 to 20 minutes or until vegetables are fork tender, cheese has melted and the top has lightly browned.
- Finish with a sprinkle of fresh thyme leaves. Serve.
NOTES
- This dish can be made up to a day ahead of time and refrigerated, tightly wrapped in foil. When ready to bake, just place the covered gratin in the oven, adding about an extra 5-7 minutes of baking time to the dish (covered).
**Just know that if you prep this dish ahead of time, you run the risk of the beets bleeding from sitting in the cream. This won’t effect the flavor at all, but it’ll change the look of this dish.** - To prevent the beets from bleeding:
- Make sure the peeled and sliced beets are just barely coated in cream to ensure they don’t dry out while baking.
- You also want to make sure the bottom layer of your baking dish is just coated with a thin layer of cream and sprinkled with Parmesan. The amount of cream used may vary just a little bit, depending on the surface area of the baking dish you’re using, so it’s best to eyeball this.


Did you make this recipe? We want to see!
tag @SpoonForkBacon and #SpoonForkBacon on Instagram
Could I use regular potatoes in place of the parsnips and keep everything the same?
Absolutely!
Made for the first time for Thanksgiving, absolutely delicious! although I couldn’t quite get the vegetables to stand…tips?
Could Coconut milk be used in place of milk or cream?
Yes, but only full fat coconut milk (ideally from a can)!
It’s a delight, I served myself three portions of how delicious it is.
That sounds absolutely incredible! The combination of sweet potatoes, beets, and parsnips with creamy, garlicky goodness is pure perfection. A stunning and delicious side dish, perfect for any special occasion!
This Cheesy Root Vegetable Gratin looks so delicious and perfect for special occasions! I love how the layers of veggies and cheese create such a beautiful dish. Can’t wait to try this recipe! 😊
This Cheesy Root Vegetable Gratin looks absolutely delicious! I love the combination of sweet potatoes, beets, and parsnips with creamy, cheesy goodness. The tips for preventing beet bleeding and ensuring even cooking are super helpful. Perfect for a cozy holiday meal.
Simple and delicious! Brought it to christmas dinner and it was a hit with the family!
Delish!!!!!!!! What a simple and delicious dish! And it looks so pretty!!!
Have not made but will certainly for Christmas when I visit my family in Ohio fro Victoria!
could you use carrots?
yes! I would just try to find and use the biggest/thickest carrots you can find so they can match the size of the other root vegetables as close as possible!
It was lovely! But very watery so I’m sure I did something wrong. Please help.
This recipe was delicious! I had literally never used a parsnip in my life and they were a beautiful addition to this dish. Having a mandoline definitely helped the prep, but it would have been worth it to have to hand-slice. Don’t skimp on using heavy cream.
This dish was exceptional and I intend to make it for all special occasion dinners or dinner with friends. my husband said it is a keeper and I agree. our guests loved it at Christmas dinner. thank you for a superb recipe
Hi there! could I lay the vegetable down instead of them sitting up?
Yes!