• Skip to primary navigation
  • Skip to main content
  • Skip to primary sidebar
  • Skip to footer
Spoon Fork BaconSpoon Fork Bacon
  • Navigation Menu: Social Icons

    • Facebook
    • Instagram
    • Pinterest
    • YouTube
    • Twitter
    • TikTok
  • What’s for Dinner?
  • Recipes By Category
  • Most Recent
  • Contact
  • Shop
menu icon
go to homepage
subscribe
search icon
Homepage link
  • Recipes By Category
  • Most Recent
  • What’s for Dinner?
  • Shop
  • Contact
    • Facebook
    • Instagram
    • Pinterest
    • YouTube
    • Twitter
    • TikTok
  • ×

    Home > Blog > DIY > DIY Towel Ring

    DIY Towel Ring

    by Teri Lyn Fisher · Published: Sep 23, 2015 · Modified: May 25, 2020

    A close up of DIY beaded towel ring with towels hanging on them.Hi! I’m so excited to present a NEW DIY! It’s been a very long time since our last DIY, and I love this new one. A DIY Towel Ring! This is pretty easy to complete once you have all the supplies. So let’s get started!
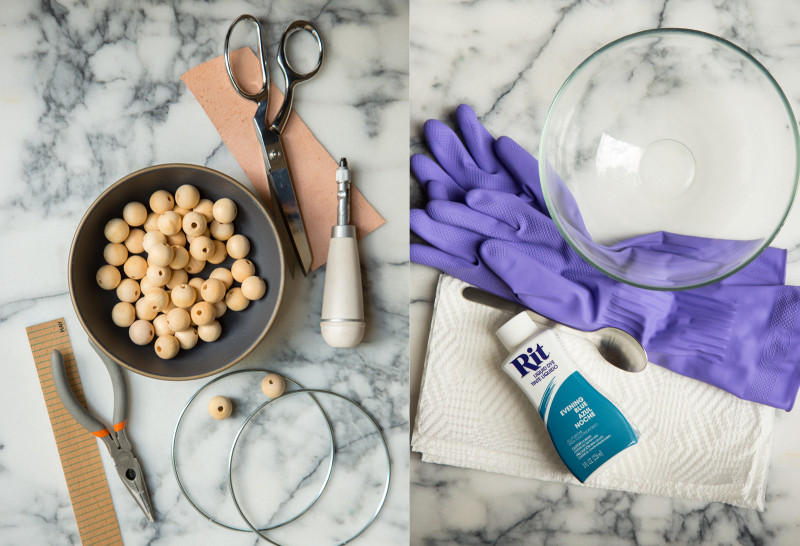
    A split photo of supplies needed to make and dye the beaded towel rings.
    Supplies:
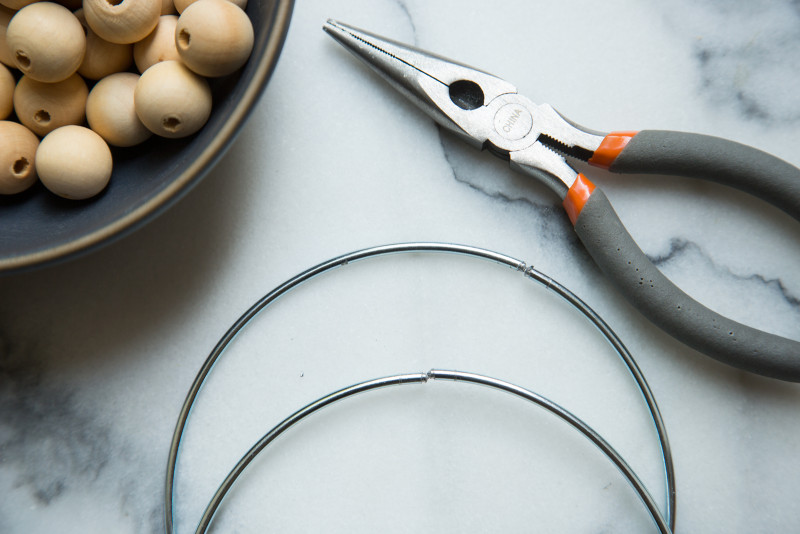
    – 5” metal ring (usually near leather section at craft store, comes in a pack of 4), or from amazon
    – wire cutter or tile nipper (I used a tile nipper which worked really well)
    – unfinished wood beads  (I used 3/4”/20mm, 1 ring takes 20 beads)
    – Rit dye in your choice of color (I prefer using the liquid kind, color is Evening Blue Azule)
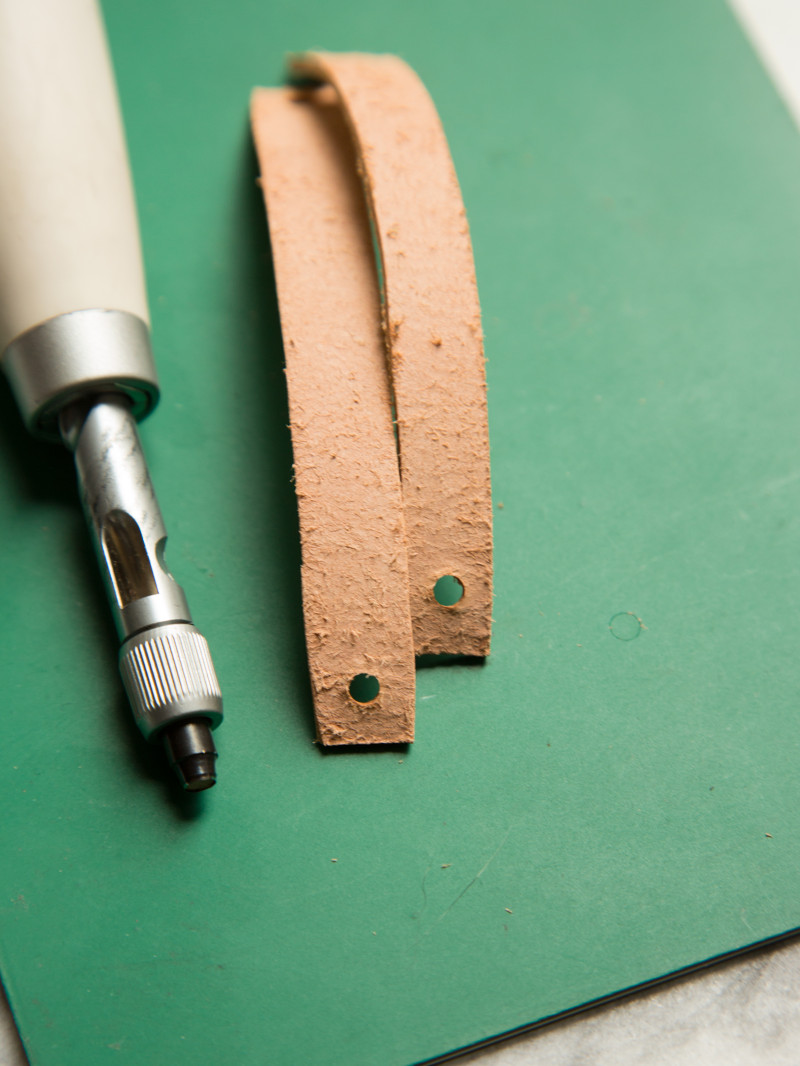
    – Leather
    – Ruler
    – Scissors for cutting leather, or an exacto knife
    – Screw Punch
    – Glue (regular gorilla glue works really well) *not pictured
    – large glass bowl or whatever you have that won’t stain from the dye, and is microwave safe (unless you’re using the tea kettle method).
    – metal spoon *not pictured
    – rubber gloves
    – paper towels

    *also helpful to have a measuring cup and measuring spoon, or you can eyeball dye mixture if you want.

    Directions:
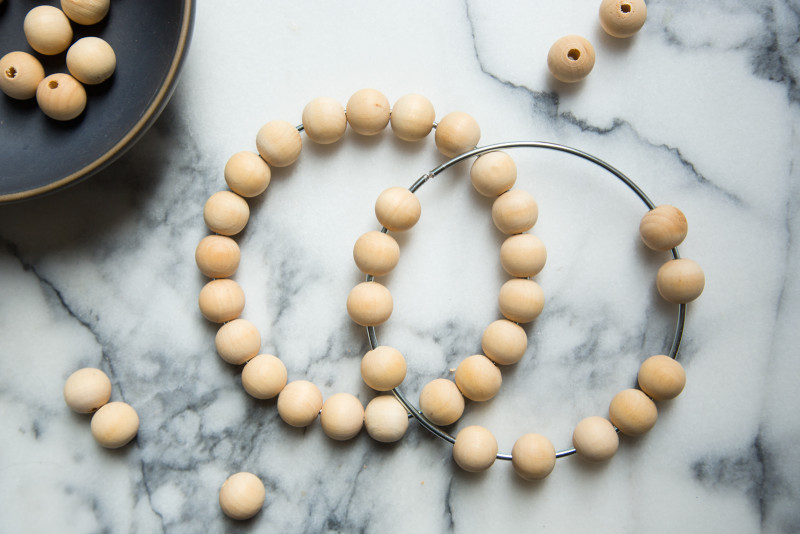
    1. Snip the ring with wire cutters/tile nippers (I found it easiest to cut where the welded seam is on the ring)
    A close up of a bowl of wooden beads, wire cutters, and cut wire rings.
    2. Pull apart and put the beads through.
    Wooden beads on the wire rings.
    3. Get ready to dye: Line your work surface with plastic or several sheets of newspaper or paper towels, have a few paper towels laid out nearby to wipe up any spills and/or blot your gloved hands before you touch things. Put on your gloves. To mix, I used 2 overflowing tbsp of dye to about 3 cups of HOT water.  You can either microwave, covered with plastic wrap, for a couple minutes (check after 1 min) or use a tea kettle and measure out with a glass measuring cup. Stir thoroughly with a metal spoon.

    * I recommend you dye a test bead first to see if your mixture is how you want it.  If it’s too dark, add more water.  If it’s too light, add more dye.  The wood will appear slightly lighter when dry.  Generally, the longer you leave it in, the more saturated it will be.
    Beaded wire rings being dipped in a bowl of dye by a gloved hand.
    Dyed beaded towel rings drying on paper towels.
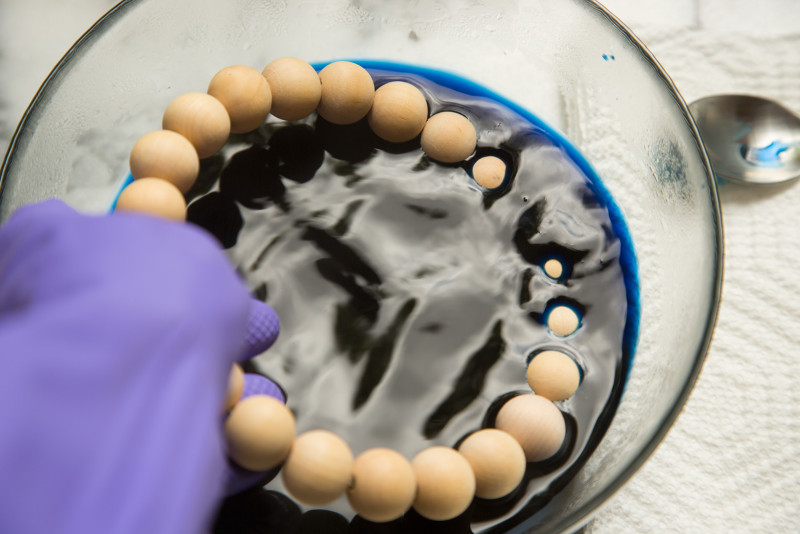
    4. Take the beaded ring and submerge it in the dye, hold under and agitate gently.  Take it out and let the excess dye drip back into the bowl.

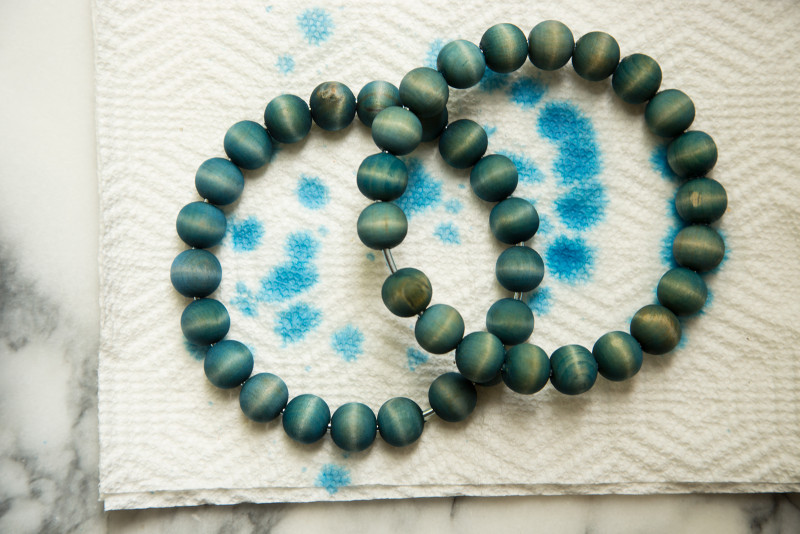
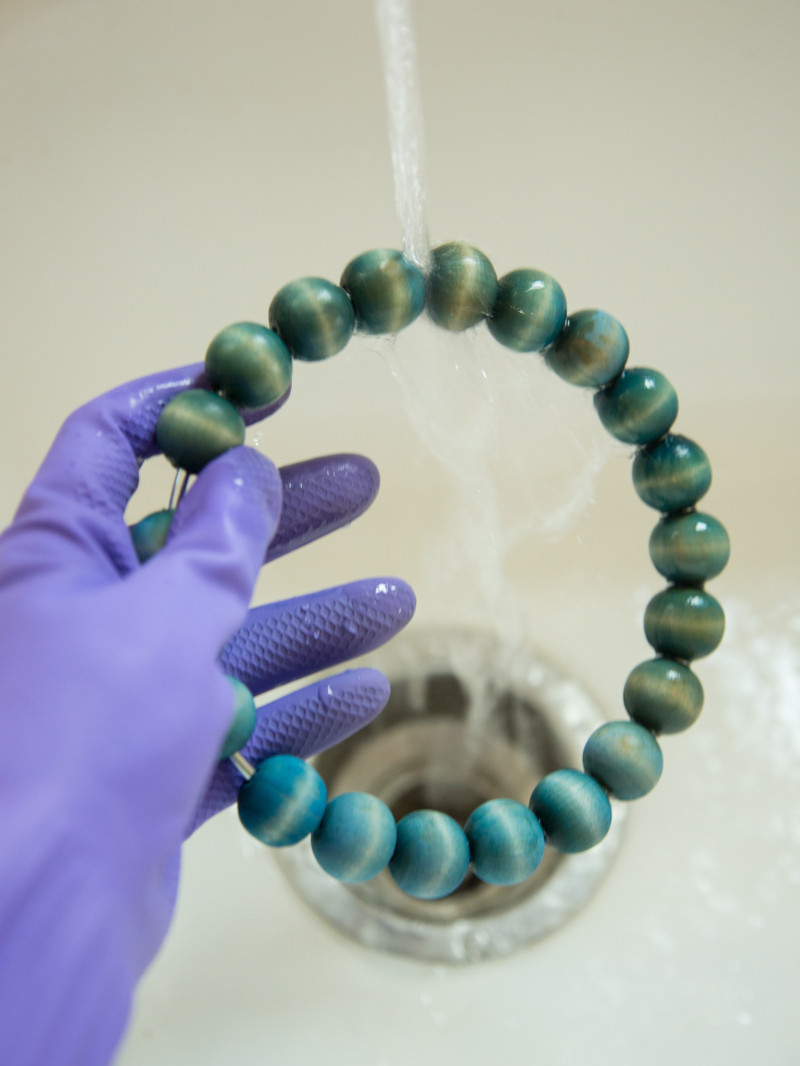
    5. Rinse the ring thoroughly in a sink under cold running water.
    Dyed beaded towel rings being rinsed off under a tap with a gloved hand.
    6. Hang to dry for a couple of hours. You don’t want to beads to be wet or they will rub off coloring onto the leather.
    7. Measure your leather strips, and mark on the back side for easy cutting. I made my strips half an inch by 4 and a half inches.
    A close up of leather pieces, scissors, and a pen.
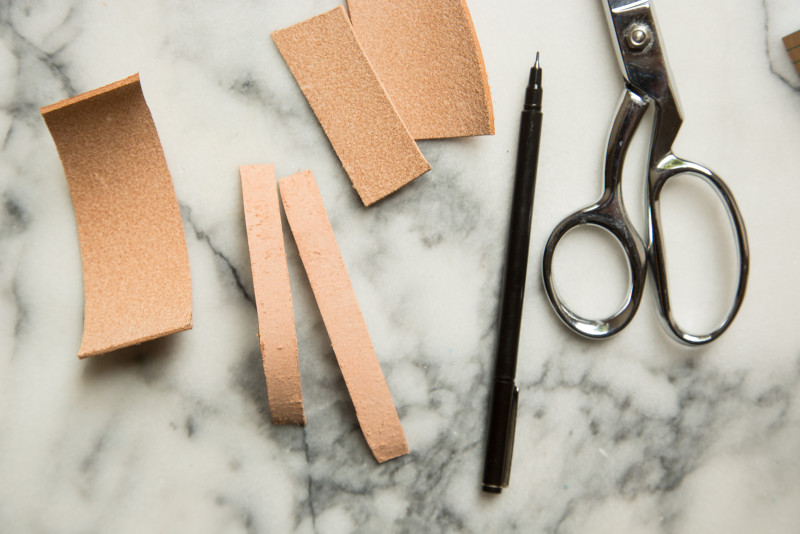
    8. After you have cut your strips, mark about half an inch up on each end and in the middle. This is where you will use the screw punch to make a hole.
    Leather strips with holes punched in the ends and a screw punch tool.
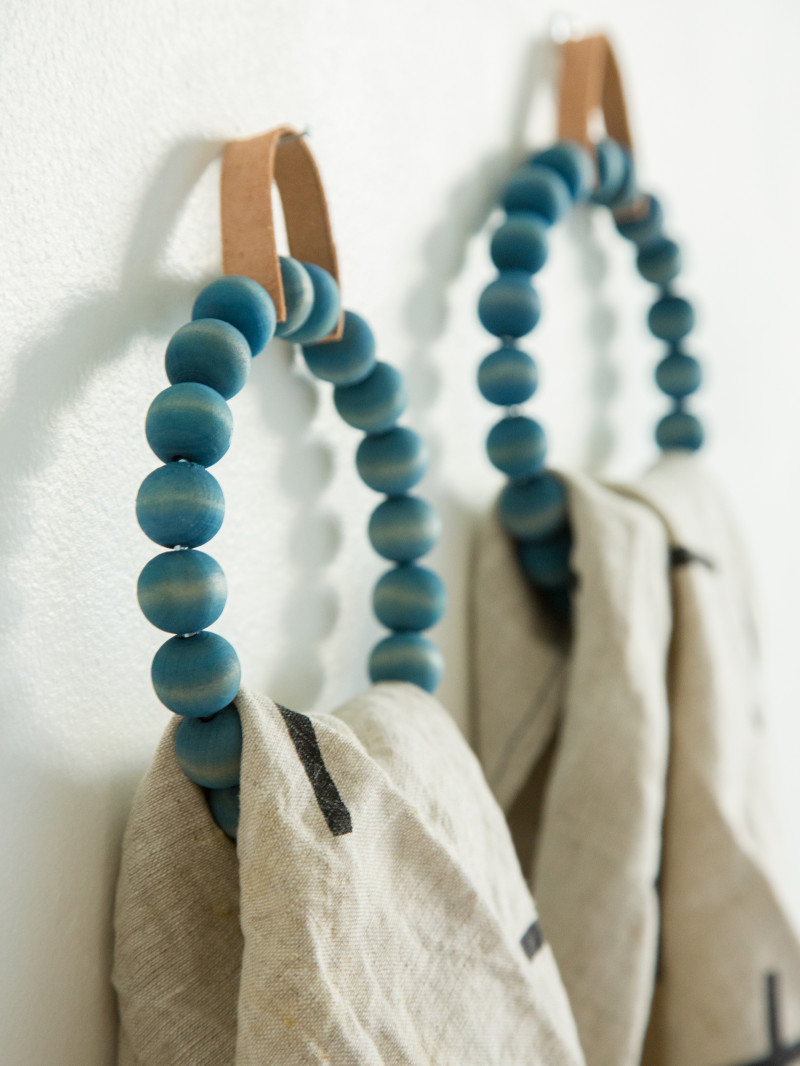
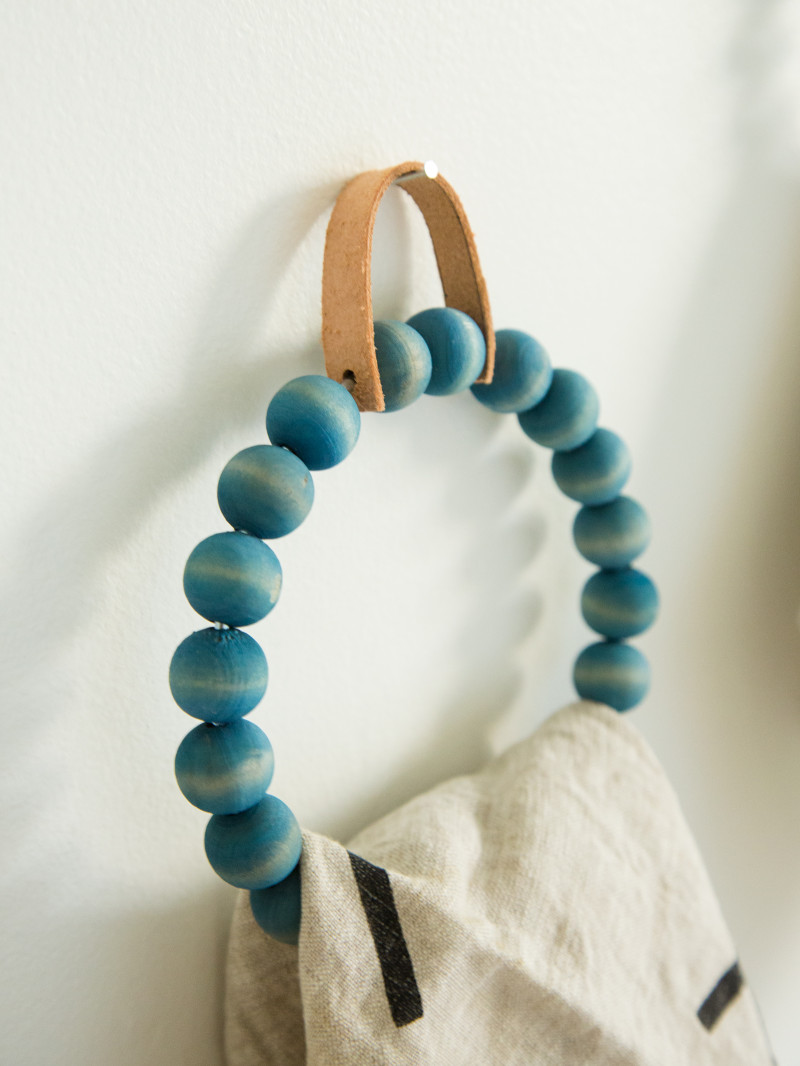
    9. Thread the strips of leather through the opening on the wire rings, and put two beads in between the strip.
    10. Find the opening in the ring and pop out a bead, this will be the one that covers the opening.  Wiggle beads if need be, to make even.  You’ll want the opening to sit inside the middle of the bead when you put it back on. Put a small, thin layer of gorilla glue over the metal opening.  Be careful, this stuff expands! Pop the bead back on and let the ring dry.  The glue should be dry in about an hour.
    11. Hang, and look at the pretty towel ring you just created! :)
    A close up of a DIY beaded towel ring with a towel hanging on it.
    I hope you guys liked this one, it’s my new favorite! :)
    ♥ Teri

    September 23, 2015 / 5 Comments

    About Teri Lyn Fisher

    Teri Lyn Fisher is half of Spoon Fork Bacon. She is also a food and cosmetics photographer. She is a big fan of hot dogs. #sfbTERI

    Previous Post: < Previous Post Chia Pudding
    Next Post: Capellini with a Smoked Salmon Cream Sauce Next Post >

    Reader Interactions

    September 23, 2015 / 5 Comments

    Comments

      Leave a Reply Cancel reply

      Your email address will not be published. Required fields are marked *

      Recipe Rating


      Did you make this recipe? We want to see!

      tag @SpoonForkBacon and #SpoonForkBacon on Instagram

    1. Kate

      September 07, 2022 at 11:09 am

      These are so cute! Did you need to put something on the beads after so the stain didn’t rub off on the towels? Thank you for sharing!

      Reply
    2. Michelle

      January 04, 2021 at 7:12 pm

      Made this and it was so easy! The longer you soak it the darker the color. I love it. Mine looks great. Recommend it.

      Reply
    3. sam

      April 30, 2016 at 12:12 am

      This looks so great – I adore the colour

      Reply
    4. Bri

      September 23, 2015 at 12:56 pm

      SO cute! What a great idea!

      Reply
    5. Josh

      September 23, 2015 at 6:36 am

      I have a set of beads like that the wife and I bought a while back… Only been used once. Wonder if we can repurpose them as a towel ring.

      Reply

    Primary Sidebar

    HI! WE ARE GLAD YOU'RE HERE!

    Teri and Jenny of Spoon Fork Bacon

    We hope you find something you love in
    our little corner of the internet.
    XOXOXO, Teri + Jenny

    ABOUT US

    As Featured On

    A complication of logos showcasing where Spoon Fork Bacon has been featured. Including delish, today show, cosmopolitan, good morning america, domino, good housekeeping, william sonoma, and country living.

    Asian Inspired

    BBQ

    PORK

    DESSERT

    For Dinner Tonight

    • Panko crusted lamb chop recipe on a plate. Panko-Crusted Lamb Chops Recipe
    • Tteokbokki recipe on a platter. Tteokbokki (Korean Spicy Rice Cakes)
    • Cajun shrimp pasta recipe in a bowl with a fork on the side. Cajun Shrimp Pasta
    • Korean Army Stew or Budae Jjigae in a pot ready to be served. Budae Jjigae (Korean Army Stew)
    • Shrimp scampi recipe on a plate with bread and lemon wedges. Shrimp Scampi Recipe
    • A collage of our best Valentine's dinner ideas. Best Valentine’s Day Dinner Ideas

    Popular Now

    • Fried pickle chips on a platter with ranch dressing. Fried Pickle Chips
    • Carrot cake recipe on a cake stand with a slice out. Carrot Cake Recipe
    • Shrimp scampi recipe on a plate with bread and lemon wedges. Shrimp Scampi Recipe
    • Brown Butter Colcannon recipe in a bowl with a spoon in it. Brown Butter Colcannon
    • Chicken and gnocchi soup in a bowl with bread on the side. Chicken Gnocchi Soup
    • Cajun shrimp pasta recipe in a bowl with a fork on the side. Cajun Shrimp Pasta

    Footer

    As Featured On
    As featured on graphic.

    GET NEW RECIPES DELIVERED TO YOUR INBOX!

    Thank you!

    You have successfully joined our subscriber list.

    Footer

    • Facebook
    • Instagram
    • Pinterest
    • RSS Feed
    • Twitter
    • TikTok

    All content including images © 2011-2022 Teri Lyn Fisher & Jenny Park. Stealing is bad karma.

    Spoon Fork Bacon contains paid advertising banners and occasionally affiliate links, and sponsored posts.
    As an Amazon Associate I earn from qualifying purchases.

    Sponsored posts are indicated at the start of such posts. All of our opinions are always our own.
    Thank you for supporting our sponsors. It helps us pay to run this site and bring you unique and original recipes.

    Privacy Policy | Accessibility Statement